Runtime Editor for Unity
Welcome to the Runtime Editor v.4.4.0 documentation. This toolset includes scripts and prefabs designed to help you create scene editors, game level editors, or your own modeling applications.
If you're new to this documentation, please start with the introduction section for an overview of the Runtime Editor and its features.
Note
Documentation for the previous versions can be found here.GPT Assistant can be found here
Contents
- Introduction
- Getting Started
- Example Scenes
- Compatibility Modes
- RTSL to AssetDatabase Project Converter
- Universal Render Pipeline Support
- HDRP Support
- Common Infrastructure
- Overview
- Expose To Editor
- IOC
- Runtime Selection
- Runtime Objects
- Runtime Tools
- Runtime Undo
- Drag And Drop
- Time Scale
- Runtime Editor UI and Window System
- Overview
- RuntimeWindow
- Built In Windows
- Window Manager
- Main and Context Menu
- Editor Extension
- Window - View-ViewModel-ViewBinding Architecture
- Custom windows
- Extending Existing Windows
- Overriding the Default Layout
- Overriding Scene Parameters
- Overriding Tools Panel
- Setting ui scale
- Overriding UI Scale
- Overriding the Theme
- Inspector View
- Inspector Configuration
- Localization
- UI Controls
- Dock Panel Control
- Tree View Control
- Menu Control
- Runtime Transform Handles
- Runtime Gizmos
- Animation Editor
- Runtime Editor Extensions
- Runtime Scripting
- Getting Started with Runtime Scripting
- Jint Script
- Declaring Variables
- Using UnityEngine API
- JintComponent.Add, JintComponent.Get
- Create Jint Script Programmatically
- More Runtime Scripting Samples
- Asset Database
- IRuntimeEditor and IAssetDatabaseModel Interfaces
- IAssetDatabaseModel vs IRuntimeEditor Interface
- Projects Root Folder Path
- Manage Projects
- Import Export Project
- Create Folder
- Set Current Folder
- Runtime Scene
- Create New, Save, Load scene
- Create, Save, Load, Delete Assets and Folders
- Instantiate asset
- Duplicate Asset
- Move Asset
- Import Export Assets
- External Asset Loaders
- Import Sources
- File Importers
- Web Storage Sample
- Serializer Extensions
- Enumerators
- Dynamic Surrogates (Preview)
- Build All
- Support
Introduction
The Runtime Editor consists of several major parts, effectively decoupled using MVVM and dependency injection mechanisms:
- Common Infrastructure APIs: Includes Selection, Tools, IOC, and Drag & Drop.
- UI Controls: DockPanel, TreeView, Main Menu, and Context Menu.
- WindowManager: Provides built-in windows and dialogs like Inspector, Scene, Hierarchy, Project, and Console.
- Transform Handles & Gizmos: Facilitates scene controls and navigation.
- Runtime Asset Database: Manages assets, scenes, and prefabs.
- Extensions: Includes Terrain Editor, Animation Editor, ProBuilder Editor, and Runtime Scripting.
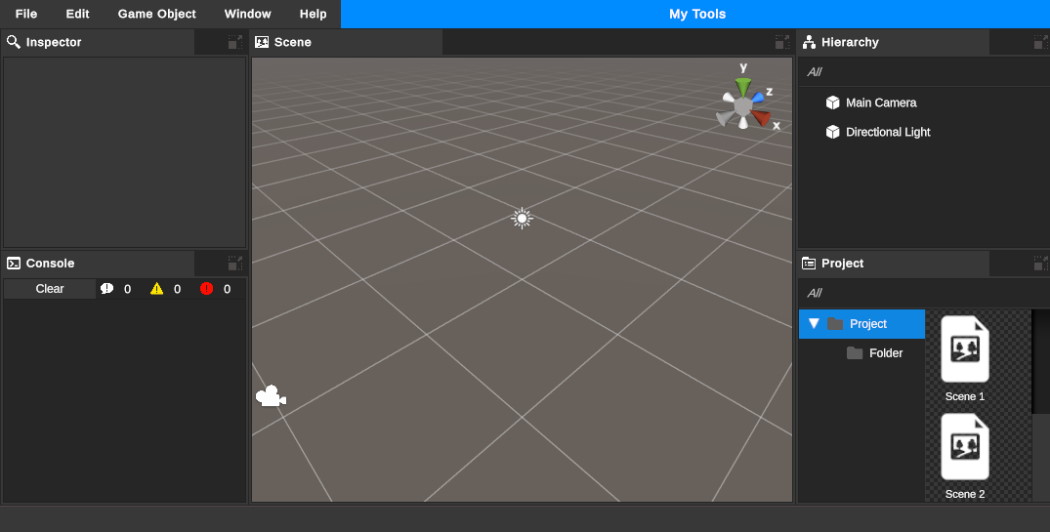
Getting Started
- Create a new scene.
- Click Tools -> Runtime Editor -> Create RTEditor.
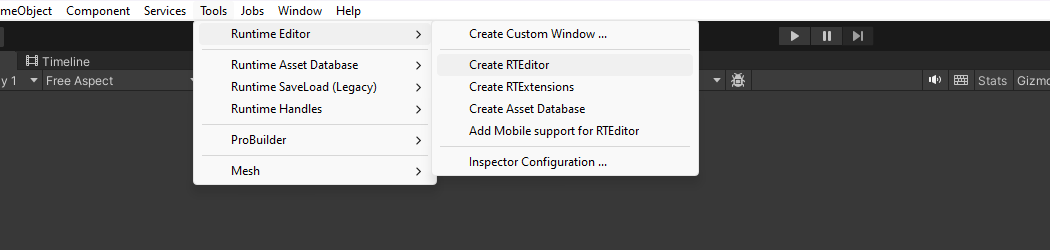
- Optionally, click Tools -> Runtime Editor -> Create RTExtensions.
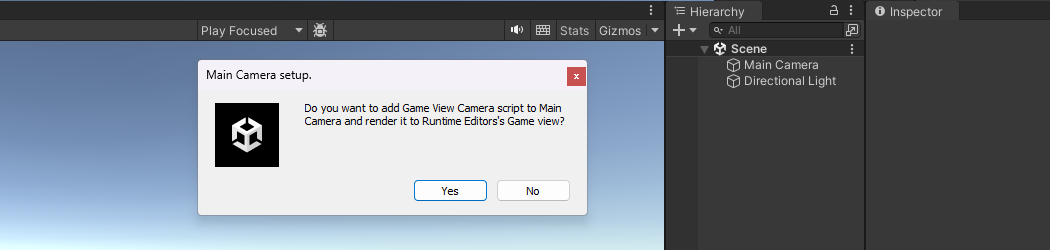
- Click "Yes" when prompted to add the Game View Camera script.
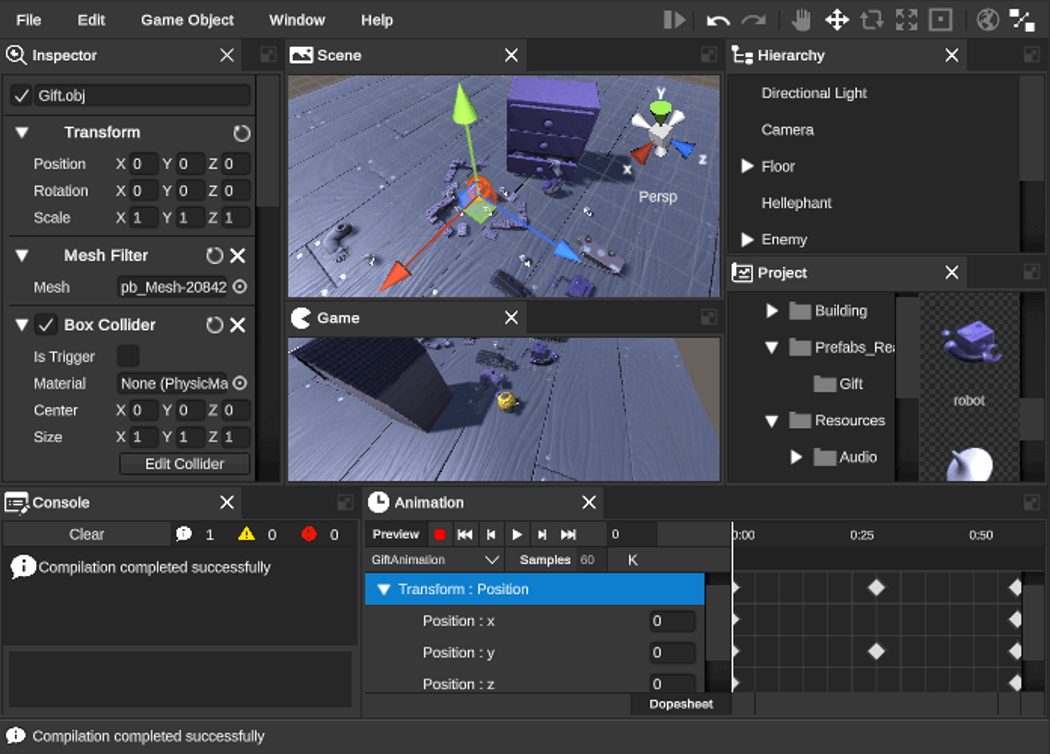
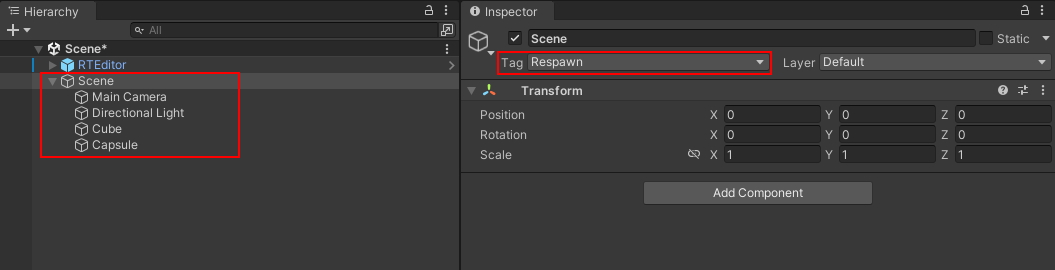
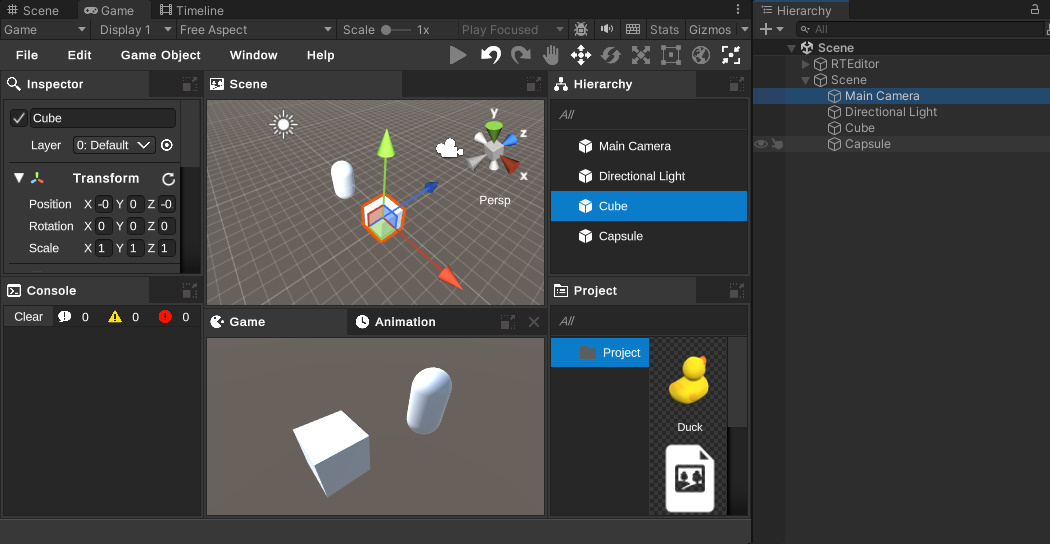
- Create several Game Objects and add the Expose To Editor component.
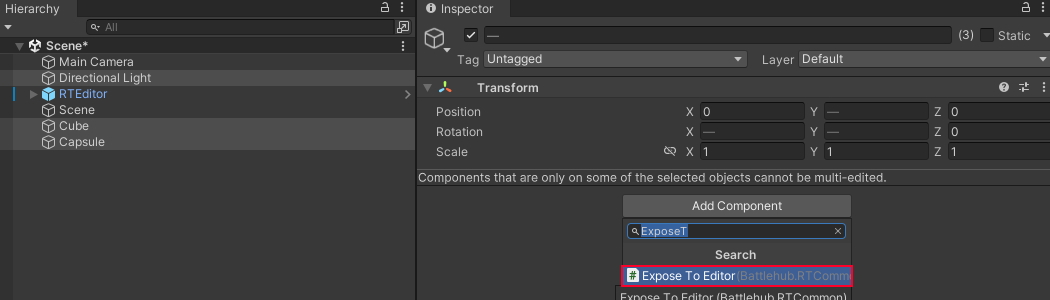
- Move these game objects to the Scene game object children.
- Press "Play".
Example Scenes
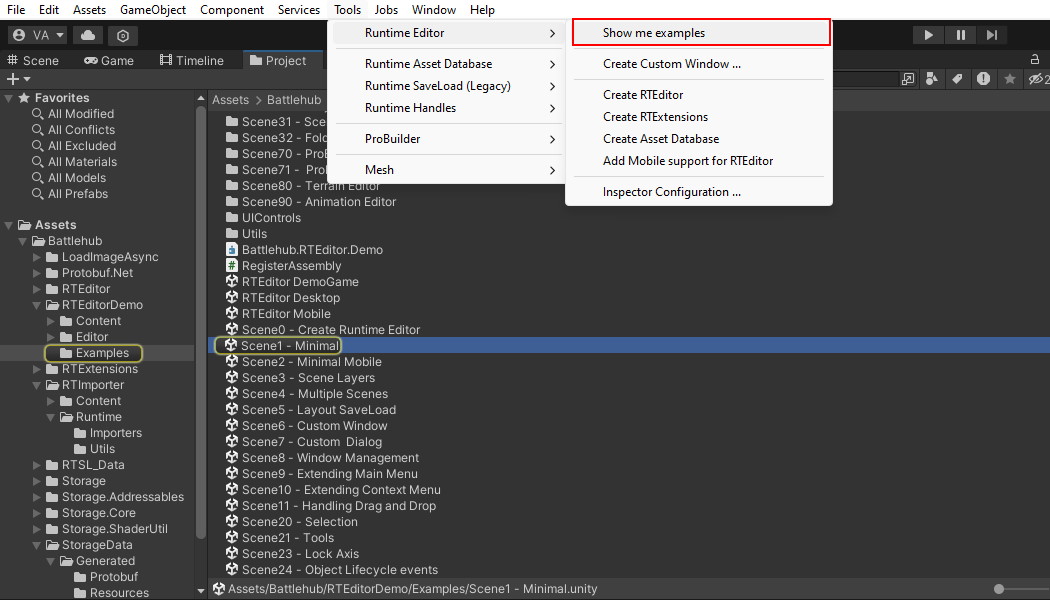
There are various example scenes available. To access them:
- Unpack "Assets/Battlehub/2 RTEditor Demo.unitypackage".
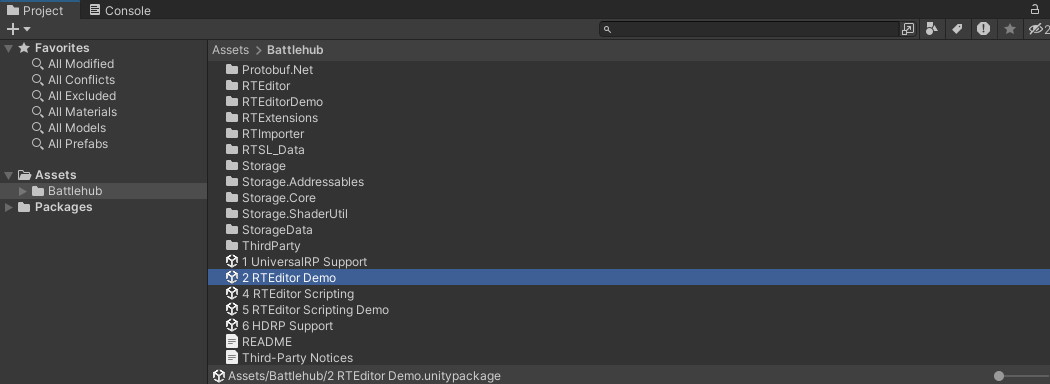
- Click Tools -> Runtime Editor -> Show me examples.
Note
If you are using Universal or HDRP, when you open the demo scene, also follow the steps in Universal Render Pipeline Support or HDRP Support.
Compatibility Modes
In Runtime Editor 4.x.x, the Runtime Asset Database has replaced the Runtime Save Load subsystem, which is now considered legacy. By default, Runtime Editor cannot open projects created using RTSL. However, there are two compatibility modes, AssetDatabaseOverRTSL and LegacyRTSL,
which allow you to open and work with projects created before RTE 4.x.x.
To select a compatibility mode, use the Compatibility Mode dropdown in the Runtime Editor component editor.

None
In this mode, users will not be able to open legacy RTSL projects. The Project window is replaced with the AssetDatabase window, the Save Scene Dialog and Save Asset Dialog are replaced with the AssetDatabaseSave dialog, and the Select Object Dialog is replaced with the AssetDatabaseSelect dialog. Additional compatibility prefabs like RTSLDeps and AssetDatabaseOverRTSL, along with corresponding compatibility scripts, are not created.
AssetDatabaseOverRTSL
In this mode, users can open both new Asset Database projects and legacy RTSL projects. The Project window is replaced with the AssetDatabase window, the Save Scene Dialog and Save Asset Dialog are replaced with the AssetDatabaseSave dialog, and the Select Object Dialog is replaced with the AssetDatabaseSelect dialog. Old IProjectAsync APIs are available, but corresponding functions must be called using the IRuntimeEditor or IAssetDatabaseModel interface, which is implemented by the AssetDatabaseOverRTSL class.
LegacyRTSL
In this mode, users can open only legacy RTSL projects. All legacy windows and APIs, such as IProjectAsync, are available. While it is possible to use some new methods of the IRuntimeEditor interface and IAssetDatabase interface, some of them might throw exceptions. This mode is not recommended.
RTSL to AssetDatabase Project Converter
An example of a project converter from the old RTSL format to the new AssetDatabase format can be found in Assets\Battlehub\RTEditorDemo\Examples\RTSL to AssetDatabase Project Converter.unity.
The converter is implemented in the RTSLProjectConverter class. It takes the RTSL project path and the new AssetDatabase project path as inputs. The converter performs the following steps:
- Copies the folder structure.
- Converts assets like materials, meshes, etc.
- Converts prefabs.
- Converts scenes.
Universal Render Pipeline Support
- Unpack "Assets/Battlehub/1 UniversalRP Support.unitypackage".
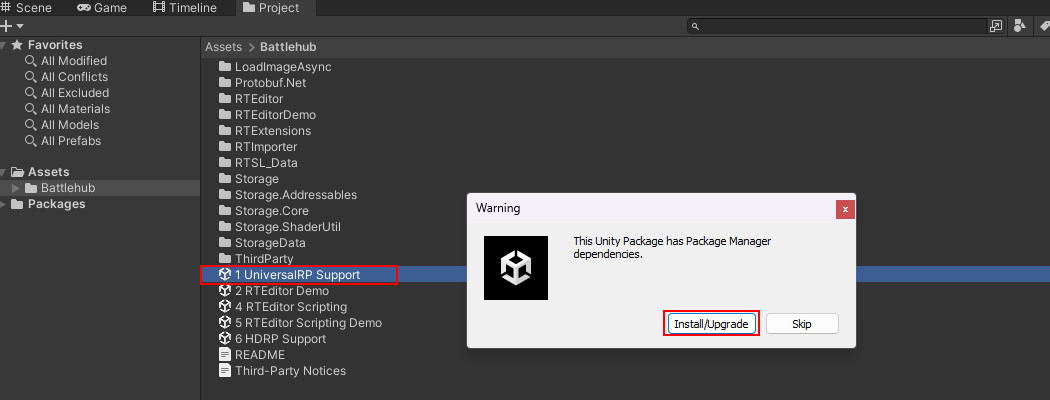
- Click "Install/Upgrade" dependencies to install the required Universal Render Pipeline package.
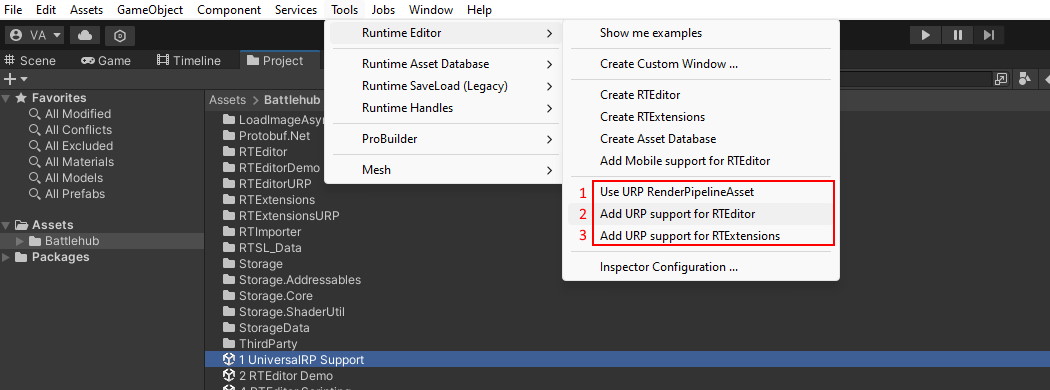
- Click Tools -> Runtime Editor -> Use URP RenderPipelineAsset.
- Click Tools -> Runtime Editor -> Add URP support for RTEditor.
- If you are using Runtime Editor Extensions (RTExtensions prefab), click Tools -> Runtime Editor -> Add URP support for RTExtensions.
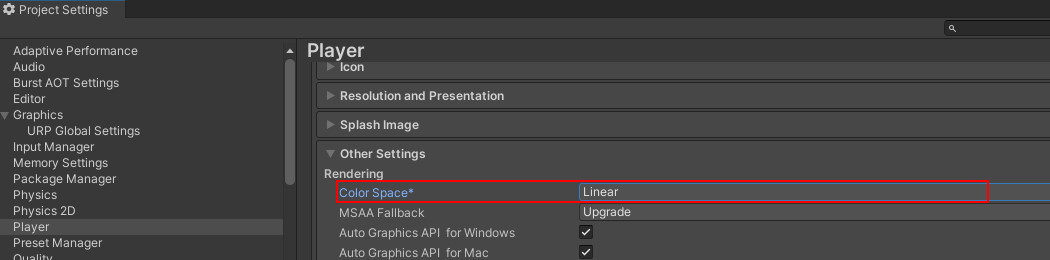
- In Project Settings / Player, switch the color space to Linear.
Note
If the scene window will always be docked, setRenderPipelineInfo.UserForegroundLayerForUI = false. See the MinimalLayoutExample script in Scene1 and Scene2 for details.
HDRP Support
The procedure is the same as for URP Support, except you need to unpack Assets/Battlehub/6 HDRP Support.unitypackage and use the corresponding HDRP menu items.
Common Infrastructure
Overview
Common infrastructure classes and interfaces form the core API of the Runtime Editor. This includes selection, object lifecycle, tools, undo-redo, and drag-and-drop APIs.
Expose To Editor
Add the Assets/Battlehub/RTEditor/Runtime/RTCommon/ExposeToEditor component to any Game Object you want to make available for selection and editing.
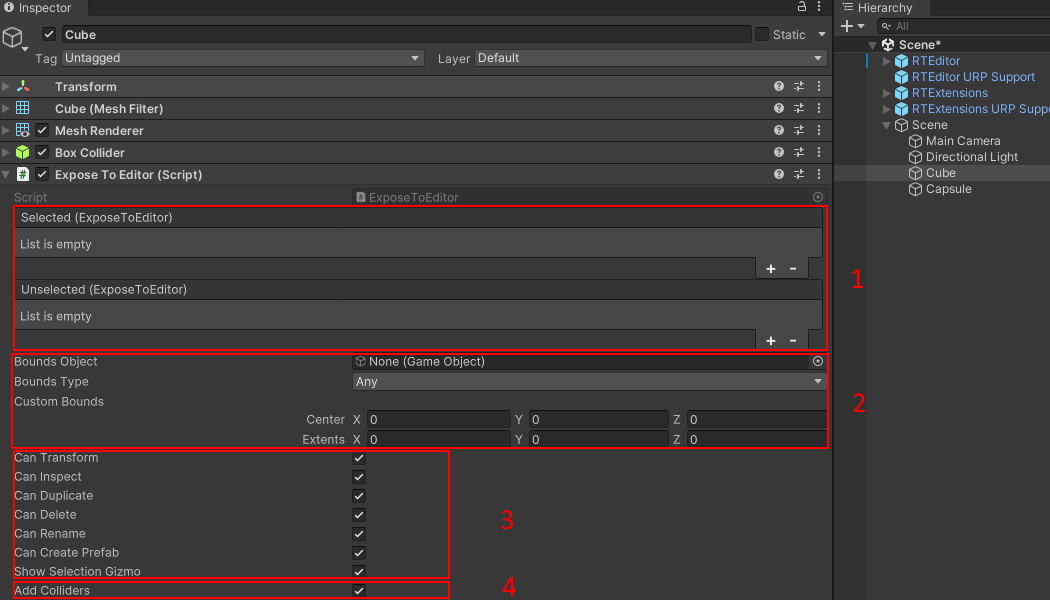
- Selection Events:
- Selected (ExposeToEditor)
- Unselected (ExposeToEditor)
- Bounds Configuration:
- Bounds Object: Specifies the GameObject to which the collider will be added (if AddColliders == false)
- Bounds Type: Determines the type of bounds to be used.
- Custom Bounds: If Bounds Type is set to Custom, it allows for specifying custom bounds with center and extents.
Capabilities:
- Can Transform, Can Inspect, Can Duplicate, Can Delete, Can Rename, Can Create Prefab, Show Selection Gizmo: These options are self-explanatory.
Collider Management:
- Add Colliders: You can unselect the Add Colliders option if you want to specify the collider to be used for selection yourself. If this option is selected, a MeshCollider will be added automatically..
IOC
Assets/Battlehub/RTEditor/Runtime/RTCommon/Utils/IOC.cs is a simple IoC container implementation.
Methods:
static T Resolve<T>(): Resolve a dependency of type 'T'.static void Register<T>(Func<T> func): Register a construction function.static void Register<T>(T instance): Register an instance.static void Unregister<T>(Func<T> func): Unregister a construction function.static void Unregister<T>(T instance): Unregister an instance.
Example 1:
using UnityEngine;
using Battlehub.RTCommon;

public interface IDependency { }

public class Dependency : MonoBehaviour, IDependency
{
    void Awake()
    {
        IOC.Register<IDependency>(this);
    }

    void OnDestroy()
    {
        IOC.Unregister<IDependency>(this);
    }
}

public class User : MonoBehaviour
{
    void Start()
    {
        IDependency dependency = IOC.Resolve<IDependency>();
    }
}
Example 2:
using UnityEngine;
using Battlehub.RTCommon;

[DefaultExecutionOrder(-1)]
public class Registrar : MonoBehaviour
{
    void Awake()
    {
        IOC.Register<IDependency>(() =>
        {
            GameObject go = new GameObject();
            return go.AddComponent<Dependency>();
        });
    }

    private void OnDestroy()
    {
        IOC.Unregister<IDependency>();
    }
}

public interface IDependency { }

public class Dependency : MonoBehaviour, IDependency
{
}

public class User : MonoBehaviour
{
    void Awake()
    {
        IDependency dependency = IOC.Resolve<IDependency>();
    }
}
Runtime Selection
The IRuntimeSelection interface is a key part of the Runtime Editor's API, providing functionality to manage and interact with the selection of objects within the editor. Here is a detailed description of its properties and methods:
Properties
- Enabled: Gets or sets a value indicating whether the selection functionality is enabled.
- EnableUndo: Gets or sets a value indicating whether undo functionality is enabled for selection changes.
- activeGameObject: Gets or sets the currently active selected GameObject.
- activeObject: Gets or sets the currently active selected object.
- objects: Gets or sets the array of currently selected objects.
- gameObjects: Gets an array of the currently selected GameObjects.
- activeTransform: Gets the Transform of the currently active selected GameObject.
- Length: Gets the number of currently selected objects.
Events
- SelectionChanged: An event that is triggered when the selection changes. Subscribers to this event can perform actions in response to selection changes.
Methods
- IsSelected(Object obj): Determines whether a given object is currently selected.
- Select(Object activeObject, Object[] selection): Selects the specified objects, with the specified object set as the active object.
This interface allows for robust selection management within the Runtime Editor, supporting multiple selection states, undo functionality, and event-driven responses to selection changes.
using UnityEngine;
using Battlehub.RTCommon;

public class RuntimeSelectionExample : MonoBehaviour
{
    IRuntimeSelection m_selection;

    void Start()
    {
        var editor = IOC.Resolve<IRTE>();
        m_selection = editor.Selection;

        // Subscribe to the selection changed event
        m_selection.SelectionChanged += OnSelectionChanged;

        // Create a sample game object
        var go = GameObject.CreatePrimitive(PrimitiveType.Capsule);
        go.AddComponent<ExposeToEditor>();

        // Add object to the scene
        editor.AddGameObjectToHierarchy(go);

        // Select the game object
        m_selection.activeObject = go;
    }

    void OnDestroy()
    {
        if (m_selection != null)
        {
            m_selection.SelectionChanged -= OnSelectionChanged;
        }
    }

    void OnSelectionChanged(Object[] unselectedObjects)
    {
        if (unselectedObjects != null)
        {
            for (int i = 0; i < unselectedObjects.Length; ++i)
            {
                Object unselected = unselectedObjects[i];
                Debug.Log("Unselected: " + unselected.name);
            }
        }

        if (m_selection.objects != null)
        {
            for (int i = 0; i < m_selection.objects.Length; ++i)
            {
                Object selected = m_selection.objects[i];
                Debug.Log("Selected: " + selected.name);
            }
        }
    }
}
Note
For more examples, see Scene20 - Selection in the Example Scenes section.
Runtime Objects
The IRuntimeObjects interface is designed to provide events and methods for managing and responding to changes in runtime objects within the Runtime Editor environment.
This interface enables the monitoring of various object lifecycle events and component-related changes.
Events
- Awaked: Triggered when an object awakens (i.e., when its Awake method is called).
- Started: Triggered when an object starts (i.e., when its Start method is called).
- Enabled: Triggered when an object is enabled.
- Disabled: Triggered when an object is disabled.
- Destroying: Triggered when an object is about to be destroyed.
- Destroyed: Triggered when an object has been destroyed.
- MarkAsDestroyedChanging: Triggered when an object's "mark as destroyed" status is about to change.
- MarkAsDestroyedChanged: Triggered when an object's "mark as destroyed" status has changed.
- TransformChanged: Triggered when an object's transform has changed.
- NameChanged: Triggered when an object's name has changed.
- ParentChanged: Triggered when an object's parent has changed.
- ComponentAdded: Triggered when a component is added to an object.
- ComponentDestroyed: Triggered when a component is removed from an object.
- ReloadComponentEditor: Triggered when a component editor needs to be reloaded, with a boolean parameter indicating whether the component was just added or is being reloaded.
Methods
- IEnumerable
Get(bool rootsOnly, bool useCache = true) : Retrieves a collection of objects exposed to the editor. TherootsOnlyparameter specifies whether to include only root objects, anduseCacheindicates whether to use cache instead of Unity Engine API calls to find objects.
Example Usage
using UnityEngine;
using Battlehub.RTCommon;

public class ListenAwakeEventExample : MonoBehaviour
{
    IRuntimeObjects m_object;

    void Start()
    {
        m_object = IOC.Resolve<IRTE>().Object;
        m_object.Awaked += OnObjectAwaked;

        GameObject go = new GameObject();
        go.AddComponent<ExposeToEditor>();
    }

    void OnDestroy()
    {
        if (m_object != null)
        {
            m_object.Awaked -= OnObjectAwaked;
        }
    }

    void OnObjectAwaked(ExposeToEditor obj)
    {
        Debug.Log("Awake: " + obj);
    }
}
Note
For more examples, see Scene24 - Object Lifecycle events in the Example Scenes section.
Runtime Tools
The RuntimeTools class allows you to track and manipulate the current tool, locking state, pivot modes, and other aspects of the editor's toolset.
Properties:
- LockObject LockAxes: Holds the aggregated locking state of selected objects.
- UnityObject ActiveTool: Reference to the active transform handle or gizmo. Active means that the user is currently interacting with it.
- RuntimeTool Current: The tool that is currently enabled for the Scene View:
- None
- Move
- Rotate
- Scale
- View
- Rect
- Custom
- RuntimePivotMode PivotMode: Indicates whether we are in Center or Pivot mode.
- RuntimePivotRotation PivotRotation: Specifies the rotation of the tool handle:
- Global
- Local
Events:
- event RuntimeToolsEvent ToolChanged: Raised when the current tool changes.
- event RuntimeToolsEvent PivotRotationChanged: Raised when the pivot rotation changes.
- event RuntimeToolsEvent PivotModeChanged: Raised when the pivot mode changes.
- event RuntimeToolsEvent LockAxesChanged: Raised when the lock axes change.
Additional Properties and Events:
- IsViewing: Indicates whether the editor is in viewing mode. Changing this property raises the
IsViewingChangedevent. - AutoFocus: Indicates whether auto-focus is enabled. Changing this property raises the
AutoFocusChangedevent. - UnitSnapping: Indicates whether unit snapping is enabled. Changing this property raises the
UnitSnappingChangedevent. - IsSnapping: Indicates whether snapping is enabled. Changing this property raises the
IsSnappingChangedevent. - SnappingMode: Specifies the snapping mode. Changing this property raises the
SnappingModeChangedevent. - CustomPivotPosition: Specifies a custom pivot position.
- SelectionMode: Specifies the selection mode. Changing this property raises the
SelectionModeChangedevent. - IsBoxSelectionEnabled: Indicates whether box selection is enabled. Changing this property raises the
IsBoxSelectionEnabledChangedevent.
Example Usage
Changing the Current Tool:
using UnityEngine;
using Battlehub.RTCommon;

public class SwitchToolBehaviour : MonoBehaviour
{
    void Start()
    {
        IRTE editor = IOC.Resolve<IRTE>();
        editor.Tools.Current = RuntimeTool.Rotate;
    }
}
Locking Axes for All Selected Objects:
using UnityEngine;
using Battlehub.RTCommon;

public class LockAxesForAllObjects : MonoBehaviour
{
    IRTE m_editor;
    void Start()
    {
        m_editor = IOC.Resolve<IRTE>();
        m_editor.Selection.SelectionChanged += OnSelectionChanged;
        m_editor.Tools.ToolChanged += OnToolChanged;
    }

    void OnDestroy()
    {
        if(m_editor != null)
        {
            m_editor.Selection.SelectionChanged -= OnSelectionChanged;
            m_editor.Tools.ToolChanged -= OnToolChanged;
        }
    }

    void OnToolChanged()
    {
        Lock();
    }

    void OnSelectionChanged(Object[] unselectedObjects)
    {
        Lock();
    }

    static void Lock()
    {
        IRTE editor = IOC.Resolve<IRTE>();
        editor.Tools.LockAxes = new LockObject
        {
            PositionY = true,
            RotationX = true,
            RotationZ = true
        };
    }
}
Note
For more examples, see Scene21 - Tools in the Example Scenes section.
Runtime Undo
The IRuntimeUndo interface is used to record changes, maintain the undo/redo stack, and perform undo and redo operations.
Properties:
- bool Enabled { get; set; }: Indicates whether undo and redo operations are enabled.
- bool CanUndo { get; }: Indicates whether an undo operation can be performed.
- bool CanRedo { get; }: Indicates whether a redo operation can be performed.
- bool IsRecording { get; }: Indicates whether multiple changes are being recorded.
Methods:
- void BeginRecord(): Begins recording multiple changes.
- void EndRecord(): Ends recording multiple changes.
- void GroupRecords(int count = -1): Groups the specified number of records into a single undo/redo operation.
- Record CreateRecord(UndoRedoCallback redoCallback, UndoRedoCallback undoCallback, PurgeCallback purgeCallback = null, EraseReferenceCallback eraseCallback = null): Creates a generic record.
- Record CreateRecord(object target, object newState, object oldState, UndoRedoCallback redoCallback, UndoRedoCallback undoCallback, PurgeCallback purgeCallback = null, EraseReferenceCallback eraseCallback = null): Creates a record with a specific target, new state, and old state.
- void RegisterCreatedObjects(ExposeToEditor[] createdObjects, Action afterRedo = null, Action afterUndo = null): Registers created objects.
- void DestroyObjects(ExposeToEditor[] destroyedObjects, Action afterRedo = null, Action afterUndo = null): Registers destroy objects operation.
- void BeginRecordValue(object target, MemberInfo memberInfo): Begins recording a value change.
- void BeginRecordValue(object target, object accessor, MemberInfo memberInfo): Begins recording a value change with accessor.
- void EndRecordValue(object target, MemberInfo memberInfo, Action afterRedo = null, Action afterUndo = null): Ends recording a value change.
- void EndRecordValue(object target, object accessor, MemberInfo memberInfo, Action
- void BeginRecordTransform(Transform target, Action
afterUndo = null) : Begins recording a transform change. - void EndRecordTransform(Transform target, Action
afterRedo = null) : Ends recording a transform change. - void BeginRecordTransform(Transform target, Transform parent, int siblingIndex = -1, Action
afterUndo = null) : Begins recording a transform change with parent and sibling index. - void EndRecordTransform(Transform target, Transform parent, int siblingIndex = -1, Action
afterRedo = null) : Ends recording a transform change with parent and sibling index. - void AddComponent(ExposeToEditor obj, Type type): Adds a component and pushes the corresponding record to the stack.
- void AddComponentWithRequirements(ExposeToEditor obj, Type type): Adds a component along with its required components.
- void DestroyComponent(Component destroy, MemberInfo[] memberInfo): Destroys a component and pushes the corresponding record to the stack.
- void Redo(): Performs a redo operation.
- void Undo(): Performs an undo operation.
- void Purge(): Purges all records. All “marked as destroyed” objects will be destroyed.
- void Erase(object oldRef, object newRef = null, bool ignoreLock = false): Replaces oldRef with newRef for all records in the stack.
- void Store(): Creates a new stack and stores the current undo and redo stack.
- void Restore(): Restores a previously stored stack.
Events:
- event RuntimeUndoEventHandler BeforeUndo: Raised before an undo operation.
- event RuntimeUndoEventHandler UndoCompleted: Raised after an undo operation.
- event RuntimeUndoEventHandler BeforeRedo: Raised before a redo operation.
- event RuntimeUndoEventHandler RedoCompleted: Raised after a redo operation.
- event RuntimeUndoEventHandler StateChanged: Raised whenever one of the following operations is performed:
- Store
- Restore
- Purge
Example Usage
Recording a Value and then Undoing Changes:
using UnityEngine;
using System.Reflection;
using Battlehub.RTCommon;
using Battlehub.Utils;

public class RecordValueThenUndoChanges : MonoBehaviour
{
    IRuntimeUndo m_undo;

    [SerializeField]
    int m_value = 1;

    void Start()
    {
        m_undo = IOC.Resolve<IRTE>().Undo;
        m_undo.UndoCompleted += OnUndoCompleted;

        var valueInfo = Strong.MemberInfo((RecordValueThenUndoChanges x) => x.m_value);

        m_undo.BeginRecordValue(this, valueInfo);
        m_value = 2;
        m_undo.EndRecordValue(this, valueInfo);

        m_undo.Undo();
    }

    void OnDestroy()
    {
        if (m_undo != null)
        {
            m_undo.UndoCompleted -= OnUndoCompleted;
        }
    }

    void OnUndoCompleted()
    {
        Debug.Log(m_value); // 1
    }
}
Note
For more examples, see Scene25 - Undo & Redo in the Example Scenes section.
Drag And Drop
The IDragDrop interface is used as a common interface for all drag-and-drop operations.
Properties:
- object[] DragObjects { get; }: Objects being dragged.
- object Source { get; }: Drag-and-drop operation source object.
- bool InProgress { get; }: Indicates if a drag-and-drop operation is in progress.
Methods:
- void Reset(): Cancels the current drag-and-drop operation.
- void SetCursor(KnownCursor cursorType): Sets the cursor type.
- KnownCursor.DropNotAllowed
- KnownCursor.DropAllowed
- void RaiseBeginDrag(object source, object[] dragItems, PointerEventData pointerEventData): Begins a drag-and-drop operation.
- void RaiseDrag(PointerEventData eventData): Handles the drag operation.
- void RaiseDrop(PointerEventData pointerEventData): Ends the drag-and-drop operation.
Events:
- event DragDropEventHander BeginDrag: Raised by the
RaiseBeginDragmethod. - event DragDropEventHander Drag: Raised by the
RaiseDragmethod. - event DragDropEventHander Drop: Raised by the
RaiseDropmethod.
Example Usage
In this example, we will handle a drag-and-drop operation into the console window (Add this script to the scene and try to drag and drop something from the Hierarchy or Project to the Console)
using Battlehub.RTCommon;
using UnityEngine;
using UnityEngine.EventSystems;

public class ConsoleDragDropHandler : MonoBehaviour
{
    IDragDrop m_dragDrop;
    RuntimeWindow m_target;

    void Start()
    {
        m_target = IOC.Resolve<IRTE>().GetWindow(RuntimeWindowType.Console);
        m_dragDrop = IOC.Resolve<IRTE>().DragDrop;
        m_dragDrop.Drop += OnDrop;
    }

    void OnDestroy()
    {
        if(m_dragDrop != null)
        {
            m_dragDrop.Drop -= OnDrop;
        }
    }

    void OnDrop(PointerEventData pointerEventData)
    {
        if(m_target != null && m_target.IsPointerOver)
        {
            Debug.Log(m_dragDrop.DragObjects[0]);
        }
    }
}
Note
For more examples, see Scene11 - Handling Drag and Drop in the Example Scenes section.
Time Scale
Sometimes, it's useful to "disable" physics and prevent scripts from updating, effectively pausing your scene.
To achieve this, Time.timeScale is used (see: Unity documentation).
To enable a mode where Time.timeScale is set to 0 in edit mode and 1 in play mode, set UseZeroTimeScaleInEditMode to true (default value is false).

Runtime Editor UI and Window System
Overview
The runtime editor UI is built using Unity's UGUI and includes three complex controls: Dock Panel, Tree View, and Menu.
The Runtime Editor Windows system is primarily managed using the IWindowManager interface. It allows for the creation of complex windows, such as inspectors or scenes, and simple dialogs, like messages or confirmation boxes. A key distinction is that dialogs cannot be docked and do not deactivate other windows, whereas windows can.
All windows and dialogs require a RuntimeWindow component to function correctly.
RuntimeWindow
The RuntimeWindow class provides essential properties and methods to manage window behavior, activation, and interaction within the Runtime Editor
Key Properties of RuntimeWindow
- CanActivate:
- Type:
bool - Description: Indicates whether the window can be activated.
- Default:
true
- ActivateOnAnyKey:
- Type:
bool - Description: Specifies if the window should activate on any key press.
- Default:
false
- Camera:
- Type:
Camera - Description: The camera associated with the window.
- Default:
null - Behavior: Throws
NotSupportedExceptionif set.
- Pointer:
- Type:
Pointer - Description: Manages pointer events for the window.
- IOCContainer:
- Type:
IOCContainer - Description: Inversion of Control container for dependency management within the window.
- WindowType:
- Type:
RuntimeWindowType - Description: Specifies the type of the window (e.g., Scene, Game).
- Default:
RuntimeWindowType.Scene
- Index:
- Type:
int - Description: Index used to identify and manage the window within the editor.
- CanvasGroup:
- Type:
CanvasGroup - Description: Manages canvas properties such as visibility and interaction.
Canvas:
- Type:
Canvas - Description: The parent canvas of the window.
- Type:
Background:
- Type:
Image - Description: The background image of the window.
- Type:
IsPointerOver:
- Type:
bool - Description: Indicates whether the pointer is currently over the window.
- Type:
ViewRoot:
- Type:
RectTransform - Description: The root transform for the window's view.
- Type:
Example Usage
using Battlehub.RTCommon;
using UnityEngine;

public class CustomRuntimeWindow : RuntimeWindow
{
    protected override void OnActivated()
    {
        base.OnActivated();
        Debug.Log("Window Activated");
    }

    protected override void OnDeactivated()
    {
        base.OnDeactivated();
        Debug.Log("Window Deactivated");
    }
}
Built In Windows
The built-in windows component allows you to set up built-in windows, specify whether a window is a dialog, update their content prefab, tab header, and header text, set startup arguments, and specify the maximum number of windows that can be opened simultaneously.

The BuiltInWindowNames class provides a list of names for built-in windows in the Runtime Editor. Here are some of the main built-in window names:
hljs public static class BuiltInWindowNames
{
    public readonly static string Game = RuntimeWindowType.Game.ToString().ToLower();
    public readonly static string Scene = RuntimeWindowType.Scene.ToString().ToLower();
    public readonly static string Hierarchy = RuntimeWindowType.Hierarchy.ToString().ToLower();
    public readonly static string ProjectTree = RuntimeWindowType.ProjectTree.ToString().ToLower();
    public readonly static string ProjectFolder = RuntimeWindowType.ProjectFolder.ToString().ToLower();
    public readonly static string Inspector = RuntimeWindowType.Inspector.ToString().ToLower();
    public readonly static string Console = RuntimeWindowType.Console.ToString().ToLower();
    public readonly static string Animation = RuntimeWindowType.Animation.ToString().ToLower();
    public readonly static string ToolsPanel = RuntimeWindowType.ToolsPanel.ToString().ToLower();
    public readonly static string ImportFile = RuntimeWindowType.ImportFile.ToString().ToLower();
    public readonly static string OpenProject = RuntimeWindowType.OpenProject.ToString().ToLower();
    public readonly static string About = RuntimeWindowType.About.ToString().ToLower();
    public readonly static string SaveFile = RuntimeWindowType.SaveFile.ToString().ToLower();
    public readonly static string OpenFile = RuntimeWindowType.OpenFile.ToString().ToLower();
    public readonly static string SelectColor = RuntimeWindowType.SelectColor.ToString().ToLower();
    //~~~~~~~~~~~~~~~~~~~~~~~~~~~~~~~~~~~~~~~~~~~~~~~~~~~~~~~~~~~~~~~~~~~~~~~~~~~~~~~~~~~~~~~~~~~~
    public readonly static string AssetDatabase = "assetdatabase";
    public readonly static string AssetDatabaseSaveScene = "assetdatabasesavescene";
    public readonly static string AssetDatabaseSave = "assetdatabasesave";
    public readonly static string AssetDatabaseSelect = "assetdatabaseselect";
    public readonly static string AssetDatabaseImportSource = "assetdatabaseimportsource";
    public readonly static string AssetDatabaseImport = "assetdatabaseimport";
    //~~~~~~~~~~~~~~~~~~~~~~~~~~~~~~~~~~~~~~~~~~~~~~~~~~~~~~~~~~~~~~~~~~~~~~~~~~~~~~~~~~~~~~~~~~~~
    public static string Project => ...
    public static string SaveScene => ...
    public static string SaveAsset => ...
    public static string SelectObject => ...
    public static string SelectAssetLibrary => ...
    public static string ImportAssets => ...
}
Window Manager
The IWindowManager interface provides a comprehensive set of methods for managing windows in the Runtime Editor. It allows you to create, activate, and manage both standard windows and dialog boxes. Below are some examples of how to use the IWindowManager to perform various tasks.
Properties and Methods
The IWindowManager interface includes various properties and methods to manage window layouts, components, and dialog boxes:
Properties
- bool IsDialogOpened: Returns true if a dialog is currently opened.
- RectTransform PopupRoot: Root panel for popups and floating windows.
- Transform ComponentsRoot: Root transform for additional window components.
Methods
- void SetDefaultLayout(): Rebuilds the layout using the default layout builder function.
- bool RegisterWindow(CustomWindowDescriptor desc): Registers a window with a custom descriptor.
- Transform CreateWindow(string windowTypeName, bool isFree, RegionSplitType splitType, float flexibleSize, Transform parentWindow): Creates a window of the specified type.
- bool IsWindowRegistered(string windowTypeName): Determines whether a window of the type is registered.
- WindowDescriptor GetWindowDescriptor(string windowTypeName, out bool isDialog): Gets the window descriptor.
- string GetWindowTypeName(Transform content): Gets the window type name.
- Transform GetWindow(string windowTypeName): Gets the window transform by type.
- Transform[] GetWindows(): Gets transforms of all windows.
- Transform[] GetWindows(string windowTypeName): Gets transforms of windows of the specified type.
- Transform[] GetComponents(Transform content): Gets extra components associated with the window.
- bool Exists(string windowTypeName): Checks if a window of the specified type exists.
- bool IsActive(string windowTypeName): Checks if the window of the specified type is active.
- bool IsActive(Transform content): Checks if the window is active.
- Transform FindPointerOverWindow(RuntimeWindow exceptWindow): Finds the uppermost window to which the pointer is pointing.
- bool ActivateWindow(Transform content): Activates the window of the specified content.
- void SetWindowArgs(Transform content, string args): Sets window arguments.
- void DestroyWindow(Transform content): Destroys the specified window.
- void DestroyWindowsOfType(string windowTypeName): Destroys windows of the specified type.
- void DestroyDialogWindow(): Destroys the topmost dialog window.
- void MessageBox(string header, string text, DialogAction
ok = null) : Creates a message box.
Note
For a complete list of properties and methods, refer to the IWindowManager interface definition.
Getting the Window Manager
To access the IWindowManager, use the IOC.Resolve<IWindowManager>() method:
using Battlehub.RTCommon;
using Battlehub.RTEditor;
using UnityEngine;

public class GetWindowManager : MonoBehaviour
{
    void Start()
    {
        IWindowManager wm = IOC.Resolve<IWindowManager>();
    }
}
Showing a Message Box
You can display a message box with a header and text, and handle the OK button click event:
wm.MessageBox("Header", "Text", (sender, args) =>
{
    Debug.Log("OK Click");
});
Showing a Confirmation Dialog
You can display a confirmation dialog with custom buttons and handle the Yes and No button click events:
wm.Confirmation("Header", "Text",
    (sender, args) =>
    {
        Debug.Log("Yes click");
    },
    (sender, args) =>
    {
        Debug.Log("No click");
    },
    "Yes", "No");
Activating a Window
To activate an existing window, use the ActivateWindow method with the name of the window:
wm.ActivateWindow(BuiltInWindowNames.Scene);
Creating a Window
To create a new window, use the CreateWindow method with the name of the window:
wm.CreateWindow(BuiltInWindowNames.Scene);
Creating a Dialog Window
To create a dialog window, use the CreateDialogWindow method with the name of the window and handle the OK and Cancel button click events:
IWindowManager wm = IOC.Resolve<IWindowManager>();
wm.CreateDialogWindow(BuiltInWindowNames.About, "Header",
    (sender, args) => { Debug.Log("OK"); },
    (sender, args) => { Debug.Log("Cancel"); });
Note
For examples, see Scene8 - Window Management in the Example Scenes section.
Main and Context Menu
The Runtime Editor uses the Menu control to implement both the main menu and context menus. To extend the main menu, you can create a static class with the [MenuDefinition] attribute and add static methods with the [MenuCommand] attribute.
Extending the Main Menu
To add new commands or modify existing ones, follow the steps below:
- Create a static class with the [MenuDefinition] attribute.
- Add static methods with the [MenuCommand] attribute to define new menu items or modify existing ones.
using Battlehub.RTCommon;
using Battlehub.RTEditor;
using Battlehub.UIControls.MenuControl;
using UnityEngine;

[MenuDefinition]
public static class MyMenu
{
    // Add new command to existing menu
    [MenuCommand("MenuWindow/Create My Window")]
    public static void CreateMyWindow()
    {
        Debug.Log("Create My Window");
    }

    // Add new command to new menu
    [MenuCommand("My Menu/My Submenu/My Command")]
    public static void CreateMyMenu()
    {
        Debug.Log("Create My Menu");
    }

    // Disable menu item
    [MenuCommand("My Menu/My Submenu/My Command", validate: true)]
    public static bool ValidateMyCommand()
    {
        Debug.Log("Disable My Command");
        return false;
    }

    // Replace existing menu item
    [MenuCommand("MenuFile/Close")]
    public static void Close()
    {
        Debug.Log("Intercepted");

        IRuntimeEditor rte = IOC.Resolve<IRuntimeEditor>();
        rte.Close();
    }

    // Hide existing menu item
    [MenuCommand("MenuHelp/About RTE", hide: true)]
    public static void HideAbout() { }
}

Instance Methods as Menu Commands
It is possible to use instance methods as menu commands. For this to work, the corresponding MonoBehaviour must exist in the scene.
using Battlehub.UIControls.MenuControl;
using UnityEngine;

[MenuDefinition]
public class MyMenu : MonoBehaviour
{
    // Add new command to new menu
    [MenuCommand("My Menu/My Submenu/My Command")]
    public void CreateMyMenu()
    {
        Debug.Log("Create My Menu");
    }

    // Disable menu item
    [MenuCommand("My Menu/My Submenu/My Command", validate: true)]
    public bool ValidateMyCommand()
    {
        Debug.Log("Disable My Command");
        return false;
    }
}
MenuDefinition with the sceneName parameter
Use the [MenuDefinition] attribute with the sceneName parameter to specify the scene. This way, the menu will only exist in the Unity scene with the corresponding name.
using Battlehub.UIControls.MenuControl;
using UnityEngine;

[MenuDefinition(sceneName:"Scene")]
public class MyMenu : MonoBehaviour
{

    // Add new command to new menu
    [MenuCommand("My Menu/My Submenu/My Command")]
    public void CreateMyMenu()
    {
        Debug.Log("Create My Menu");
    }
}
Note
For examples, see Scene9 - Extending Main Menu in the Example Scenes section.
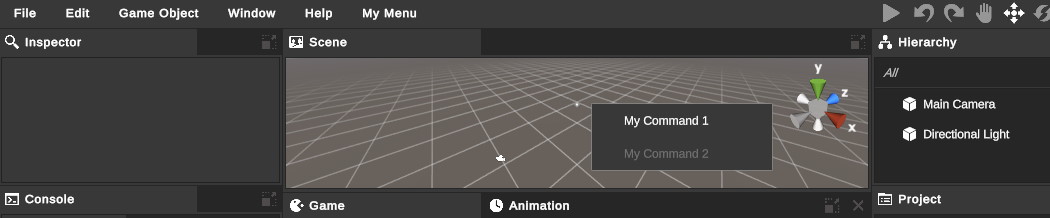
Opening a Context Menu with Custom Commands
The IContextMenuModel interface defines the structure for managing context menus within the runtime editor. It provides methods and events to create, open, and manage context menus dynamically.
Events
- event EventHandler
Open : Event triggered when the context menu is opened. TheContextMenuArgsprovides details about the menu items and their context. - event EventHandler Close: Event triggered when the context menu is closed.
Methods
- void RaiseOpen(ContextMenuArgs args): Raises the
Openevent with the specified context menu arguments. - void Show(): Shows an empty context menu. It is possible to add menu items in Open event handler.
- void Show(params ContextMenuItem[] items): Shows a context menu with the specified items.
- void Show(ContextMenuArgs args): Shows a context menu using the specified
ContextMenuArgs. TheContextMenuArgsincludes details about the menu items and their context.
To open a context menu with custom commands, follow these steps:
- Define a class with methods to open the context menu.
- Use the IContextMenuModel interface to create and show the context menu with the defined commands.
using Battlehub.RTCommon;
using Battlehub.RTEditor;
using Battlehub.RTEditor.Models;
using UnityEngine;

public class MyContextMenu : MonoBehaviour
{
    private void Update()
    {
        if (Input.GetKeyDown(KeyCode.Space))
        {
            OpenContextMenu();
        }
    }

    public void OpenContextMenu()
    {
        IContextMenuModel contextMenu = IOC.Resolve<IContextMenuModel>();

        contextMenu.Show(
            new ContextMenuItem
            {
                Path = "My Command 1",
                Action = arg =>
                {
                    Debug.Log("Run My Command1");

                    var editor = IOC.Resolve<IRuntimeEditor>();
                    Debug.Log(editor.Selection.activeGameObject);
                }
            },
            new ContextMenuItem
            {
                Path = "My Command 2",
                Action = arg => Debug.Log("Run My Command2"),
                Validate = arg => arg.IsValid = false
            });
    }
}
Basically, the same can be done using the following syntax:
hljs using Battlehub.RTCommon;
using Battlehub.RTEditor;
using Battlehub.RTEditor.Models;
using UnityEngine;

public class MyContextMenu : MonoBehaviour
{
    private void Update()
    {
        if (Input.GetKeyDown(KeyCode.Space))
        {
            OpenContextMenu();
        }
    }

    public void OpenContextMenu()
    {
        var contextMenu = IOC.Resolve<IContextMenuModel>();
        contextMenu.Open += OnContextMenuOpen;
        contextMenu.Show();
        contextMenu.Open -= OnContextMenuOpen;
    }

    private void OnContextMenuOpen(object sender, ContextMenuArgs e)
    {
        if (e.WindowName == BuiltInWindowNames.Scene)
        {
            e.AddMenuItem("My Command 1", arg =>
            {
                Debug.Log("Run My Command1");
                var editor = IOC.Resolve<IRuntimeEditor>();
                Debug.Log(editor.Selection.activeGameObject);
            });

            e.AddMenuItem("My Command 2",
                 arg => Debug.Log("Run My Command2"),
                 arg => arg.IsValid = false);
        }
    }
}
Note
For examples, see Scene10 - Extending Context Menu in the Example Scenes section.
Editor Extension
The EditorExtension class serves as a recommended base class for writing Runtime Editor Extensions. It provides two useful methods that can be overridden: OnInit() and OnCleanup(). These methods are intended for initializing and cleaning up the extension, respectively.
Methods
- void OnInit(): This method is called when the extension is initialized. You should override this method to write the extension initialization code.
- void OnCleanup(): This method is called when the extension is being cleaned up. You should override this method to write the extension cleanup code.
Example
using Battlehub.RTCommon;
using Battlehub.RTEditor;

public class EditorExtensionExample : EditorExtension
{
    protected override void OnInit()
    {
        var editor = IOC.Resolve<IRuntimeEditor>();

        // Do extension initialization here
        Debug.Log("Editor extension initialized.");
    }

    protected override void OnCleanup()
    {
        // Do extension cleanup here
        Debug.Log("Editor extension cleaned up.");
    }
}
Additional Convenience Extension Base Classes
There are three additional convenience extension base classes:
- LayoutExtension
- RuntimeWindowExtension
- SceneComponentExtension
LayoutExtension
The LayoutExtension class provides four additional methods for handling window registration, layout building, and events for additional handling before and after the layout.
Methods
- void OnRegisterWindows(IWindowManager wm): Registers custom windows.
- void OnBeforeBuildLayout(IWindowManager wm): Invoked before the layout is built.
- void OnAfterBuildLayout(IWindowManager wm): Invoked after the layout is built.
- LayoutInfo GetLayoutInfo(IWindowManager wm): Provides layout information.
Example
using Battlehub.RTCommon;
using Battlehub.RTEditor;
using UnityEngine;

public class LayoutExtensionExample : LayoutExtension
{
    [SerializeField]
    private GameObject m_sceneWindow = null;

    protected override void OnInit()
    {
    }

    protected override void OnCleanup()
    {
    }

    protected override void OnRegisterWindows(IWindowManager wm)
    {
        if (m_sceneWindow != null)
        {
            wm.OverrideWindow(BuiltInWindowNames.Scene, m_sceneWindow);
        }
    }

    protected override void OnBeforeBuildLayout(IWindowManager wm)
    {
        // Hide header toolbar
        wm.OverrideTools(null);
    }

    protected override void OnAfterBuildLayout(IWindowManager wm)
    {
        base.OnAfterBuildLayout(wm);
    }

    protected override LayoutInfo GetLayoutInfo(IWindowManager wm)
    {
        // Initializing a layout with one window - Scene
        LayoutInfo layoutInfo = wm.CreateLayoutInfo(BuiltInWindowNames.Scene);
        layoutInfo.IsHeaderVisible = false;

        return layoutInfo;
    }
}
RuntimeWindowExtension
The RuntimeWindowExtension class calls Extend and Cleanup methods for a specific window type.
Methods
- void Extend(RuntimeWindow window): Extends the specified window.
- void Cleanup(RuntimeWindow window): Cleans up the specified window.
Example
using Battlehub.RTCommon;
using Battlehub.RTEditor;
using UnityEngine;

public class RuntimeWindowExtensionExample : RuntimeWindowExtension
{
    [SerializeField]
    private RectTransform m_layer = null;

    public override string WindowTypeName => BuiltInWindowNames.Scene;

    protected override void Extend(RuntimeWindow window)
    {
        Instantiate(m_layer, window.ViewRoot).Stretch();
    }

    protected override void Cleanup(RuntimeWindow window)
    {
        base.Cleanup(window);
    }
}
SceneComponentExtension
The SceneComponentExtension class allows you to extend the scene view when it is activated and perform cleanup when it is deactivated.
Methods
- void OnSceneActivated(IRuntimeSceneComponent sceneComponent): Called when the scene is activated.
- void OnSceneDeactivated(IRuntimeSceneComponent sceneComponent): Called when the scene is deactivated.
Example
using Battlehub.RTCommon;
using Battlehub.RTEditor;
using Battlehub.RTHandles;
using UnityEngine;

public class SceneComponentExtensionExample : SceneComponentExtension
{
    protected override void OnSceneActivated(IRuntimeSceneComponent sceneComponent)
    {
        base.OnSceneActivated(sceneComponent);

        sceneComponent.PositionHandle.Drag.AddListener(OnDrag);
    }

    protected override void OnSceneDeactivated(IRuntimeSceneComponent sceneComponent)
    {
        base.OnSceneDeactivated(sceneComponent);

        sceneComponent.PositionHandle.Drag.RemoveListener(OnDrag);
    }

    private void OnDrag(BaseHandle handle)
    {
        foreach (Transform target in handle.ActiveTargets)
        {
            Vector3 p = target.position;
            target.position = new Vector3(Mathf.Round(p.x), Mathf.Round(p.y), Mathf.Round(p.z));
        }
    }
}
Window
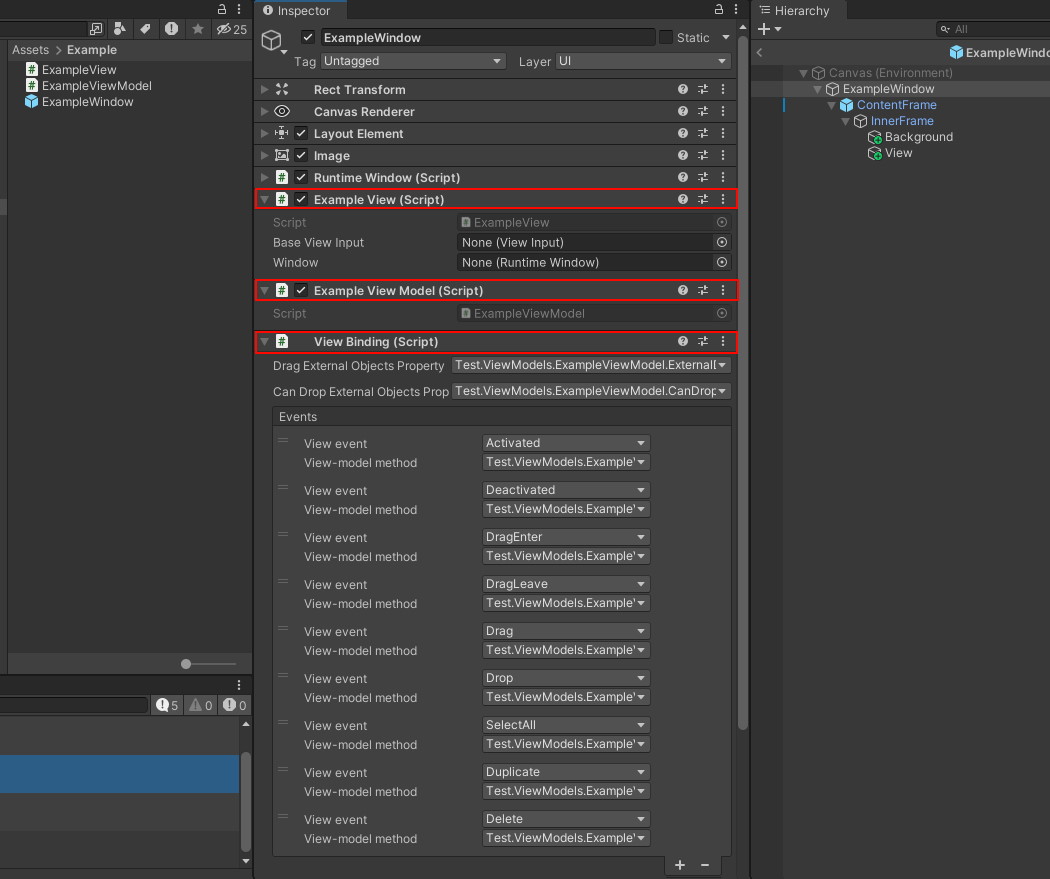
A typical Runtime Editor Window consists of several parts, including a window prefab with a RuntimeWindow component, a frame, background, and view.
It also incorporates a View, ViewModel, and ViewBinding, built on top of UnityWeld.dll.
This structure ensures a modular and flexible design, allowing for a seamless integration of UI components and binding logic.
View-ViewModel-ViewBinding Architecture
The window uses the Model-View-ViewModel (MVVM) pattern, facilitated by UnityWeld.dll, to ensure a clear separation of concerns and enhance maintainability.
- View: Contains the UI elements and visual components.
- ViewModel: Holds the logic and data for the view, acting as an intermediary between the view and the model.
- ViewBinding: Binds the view to the ViewModel, ensuring that changes in the ViewModel are reflected in the view and vice versa.
UnityWeld
https://github.com/Battlehub0x/Unity-Weld?tab=readme-ov-file
View
The View class in the Runtime Editor framework is responsible for managing the visual representation and interaction logic of editor windows. It handles various events related to dragging, dropping, activating, and deactivating, and it provides mechanisms for binding the view to a ViewModel.
Key Properties
- DragObjects: An enumerable property that holds the objects being dragged.
- CanDropExternalObjects: A boolean property indicating whether external drag objects can be dropped.
- IsDraggingOver: A boolean property indicating whether a drag operation is currently over the view.
- ViewInput: A protected property providing access to the
ViewInputcomponent. - Window: A protected property providing access to the associated
RuntimeWindow. - Editor: A protected property providing access to the
IRTEinstance.
Key Events
- SelectAll: An event triggered to select all items.
- Duplicate: An event triggered to duplicate items.
- Delete: An event triggered to delete items.
- DragEnter: An event triggered when a drag operation enters the view.
- DragLeave: An event triggered when a drag operation leaves the view.
- Drag: An event triggered during a drag operation.
- Drop: An event triggered when a drop operation occurs.
- DragObjectsChanged: An event triggered when the
DragObjectsproperty changes. - Activated: An event triggered when the view is activated.
- Deactivated: An event triggered when the view is deactivated.
Key Methods
- Awake(): Initializes the view, setting up event handlers for the associated
RuntimeWindow. - OnEnable(): Called when the view is enabled.
- Start(): Ensures the
ViewInputcomponent is present. - OnDisable(): Called when the view is disabled.
- OnDestroy(): Cleans up event handlers and references when the view is destroyed.
- OnDragEnter(PointerEventData): Handles the drag enter event, updating the
DragObjectsproperty and setting the cursor. - OnDragLeave(PointerEventData): Handles the drag leave event, resetting the
DragObjectsproperty and setting the cursor. - OnDrag(PointerEventData): Handles the drag event.
- OnDrop(PointerEventData): Handles the drop event, resetting the
DragObjectsproperty. - OnActivated(object, EventArgs): Handles the activation event.
- OnDeactivated(object, EventArgs): Handles the deactivation event.
Utility Methods
- ReplaceWith
(Component, bool) : Replaces the currentViewcomponent with a new one of typeT. - ReplaceWith
(GameObject, bool) : Replaces the currentViewcomponent on the specifiedGameObjectwith a new one of typeT. - ReplaceWith(Type, Component, bool): Replaces the current
Viewcomponent with a new one of the specified type. - ReplaceWith(Type, GameObject, bool): Replaces the current
Viewcomponent on the specifiedGameObjectwith a new one of the specified type.
Example Usage
using Battlehub.RTCommon;
using Battlehub.RTEditor.Views;
using UnityEngine;
using UnityEngine.EventSystems;

public class CustomView : View
{
    protected override void Awake()
    {
        base.Awake();
        Debug.Log("CustomView Awake");
    }

    protected override void OnEnable()
    {
        base.OnEnable();
        Debug.Log("CustomView OnEnable");
    }

    protected override void OnDisable()
    {
        base.OnDisable();
        Debug.Log("CustomView OnDisable");
    }

    protected override void OnDragEnter(PointerEventData pointerEventData)
    {
        base.OnDragEnter(pointerEventData);
        Debug.Log("Drag entered CustomView");
    }

    protected override void OnDrop(PointerEventData pointerEventData)
    {
        base.OnDrop(pointerEventData);
        Debug.Log("Dropped on CustomView");
    }
}
ViewModel
The ViewModel base class is a foundational component in the MVVM architecture used within the Runtime Editor. It provides essential properties and methods to facilitate the interaction between the view and the underlying data and logic. This class inherits from ViewModelBase and uses the UnityWeld.Binding attribute for data binding.
Key Properties
- CanDropExternalObjects: A boolean property indicating whether external drag objects can be dropped. It uses
RaisePropertyChangedto notify the view of any changes. - ExternalDragObjects: An enumerable property that holds the external drag objects.
- Editor: Provides access to the
IRuntimeEditorinstance. - Localization: Provides access to the
ILocalizationinstance. - WindowManager: Provides access to the
IWindowManagerinstance. - Selection: Represents the current runtime selection.
- Undo: Represents the undo functionality.
- SelectionOverride: Allows overriding the default selection behavior.
- UndoOverride: Allows overriding the default undo behavior.
- WindowName: The name of the window associated with this ViewModel.
Key Methods
Awake(): Initializes the
Editor,Localization, andWindowManagerproperties and sets theWindowNameif the ViewModel is attached to aRuntimeWindow.OnEnable(): Sets up the
SelectionandUndoproperties.OnDisable(): Called when the ViewModel is disabled.
OnDestroy(): Cleans up references to the
Editor,Localization,WindowManager,Selection, andUndo.SetBusy(): Sets the editor to a busy state.
OnActivated(): Called when the ViewModel is activated.
OnDeactivated(): Called when the ViewModel is deactivated.
OnSelectAll(): Handles the select all action.
OnDelete(): Handles the delete action.
OnDuplicate(): Handles the duplicate action.
OnExternalObjectEnter(): Called when an external object enters the drop area.
OnExternalObjectLeave(): Called when an external object leaves the drop area.
OnExternalObjectDrag(): Called during the dragging of an external object.
OnExternalObjectDrop(): Called when an external object is dropped.
RaisePropertyChanged(string propertyName):
- Notifies listeners that a property value has changed.
- Parameter:
propertyName(string) - The name of the property that changed.
- RaisePropertyChanged(PropertyChangedEventArgs args):
- Notifies listeners that a property value has changed using
PropertyChangedEventArgs. - Parameter:
args(PropertyChangedEventArgs) - The event arguments containing the property name.
- ReplaceWith
(UnityEngine.Component component) where T : ViewModelBase :
- Replaces the current
ViewModelBasecomponent on the specified component's game object with a new one of typeT. - Parameter:
component(UnityEngine.Component) - The component whose game object's view model will be replaced.
- ReplaceWith
(GameObject go) where T : ViewModelBase :
- Replaces the current
ViewModelBasecomponent on the specified game object with a new one of typeT. - Parameter:
go(GameObject) - The game object whose view model will be replaced.
- ReplaceWith(Type type, UnityEngine.Component component):
- Replaces the current
ViewModelBasecomponent on the specified component's game object with a new one of the specified type. - Parameter:
type(Type) - The type of the new view model. - Parameter:
component(UnityEngine.Component) - The component whose game object's view model will be replaced.
- ReplaceWith(Type type, GameObject go):
- Replaces the current
ViewModelBasecomponent on the specified game object with a new one of the specified type. - Parameter:
type(Type) - The type of the new view model. - Parameter:
go(GameObject) - The game object whose view model will be replaced.
Example Usage
[Binding]
public class MyViewModel : ViewModel
{
    private bool m_isEnabled;

    [Binding]
    public bool IsEnabled
    {
        get { return m_isEnabled; }
        set
        {
            if (m_isEnabled != value)
            {
                m_isEnabled = value;
                RaisePropertyChanged(nameof(IsEnabled));
            }
        }
    }

    protected override void OnActivated()
    {
        base.OnActivated();
        Debug.Log("ViewModel activated.");
    }

    protected override void OnDeactivated()
    {
        base.OnDeactivated();
        Debug.Log("ViewModel deactivated.");
    }

    [Binding]
    public override void OnSelectAll()
    {
        base.OnSelectAll();
        Debug.Log("Select All action triggered.");
    }

    [Binding]
    public override void OnDelete()
    {
        base.OnDelete();
        Debug.Log("Delete action triggered.");
    }
}
HierarchicalDataViewModel
The HierarchicalDataViewModel<T> class is a base view model class used for managing hierarchical data structures in the Runtime Editor, such as those found in Hierarchy and Project windows.
This class provides mechanisms for managing tree-like data structures and handling common operations like selection, drag-and-drop, and context menus.
Key Properties
- DataSource: Gets the current instance as the data source for hierarchical data binding.
- SelectedItem: Gets or sets the currently selected item.
- SelectedItems: Gets or sets the collection of currently selected items.
- CanDropItems: Indicates whether items can be dropped into the current target.
- SourceItems: Gets or sets the items that are being dragged.
- TargetItem: Gets or sets the item that is the current drop target.
- ContextMenu: Gets or sets the collection of context menu items.
Key Events
- HierarchicalDataChanged: Raised when the hierarchical data changes.
- ContextMenuOpened: Raised when the context menu is opened.
Key Methods
- RaiseHierarchicalDataChanged: Raises the
HierarchicalDataChangedevent with the specified arguments. - RaiseItemAdded: Raises the
HierarchicalDataChangedevent to indicate an item was added. - RaiseItemInserted: Raises the
HierarchicalDataChangedevent to indicate an item was inserted. - RaiseItemRemoved: Raises the
HierarchicalDataChangedevent to indicate an item was removed. - RaiseRemoveSelected: Raises the
HierarchicalDataChangedevent to indicate selected items should be removed. - RaiseNextSiblingChanged: Raises the
HierarchicalDataChangedevent to indicate the next sibling of an item has changed. - RaisePrevSiblingChanged: Raises the
HierarchicalDataChangedevent to indicate the previous sibling of an item has changed. - RaiseParentChanged: Raises the
HierarchicalDataChangedevent to indicate the parent of an item has changed. - RaiseExpand: Raises the
HierarchicalDataChangedevent to indicate an item should be expanded. - RaiseCollapse: Raises the
HierarchicalDataChangedevent to indicate an item should be collapsed. - RaiseSelect: Raises the
HierarchicalDataChangedevent to select items. - RaiseReset: Raises the
HierarchicalDataChangedevent to reset the hierarchical data. - RaiseDataBindVisible: Raises the
HierarchicalDataChangedevent to rebind the visible data.
Context Menu Handling
- GetContextMenuAnchor: Returns the context menu anchor, which includes the target item and selected items.
- OpenContextMenu: Opens the context menu and populates it with items.
- OnContextMenu: Method for adding items to the context menu. Override this method to customize the context menu.
IHierarchicalData Implementation
- GetChildren: Returns the children of a given parent item.
- GetFlags: Returns the hierarchical data flags.
- GetItemFlags: Returns the flags for a specific item.
- GetParent: Returns the parent of a given item.
- HasChildren: Indicates whether a given item has children.
- IndexOf: Returns the index of a child item within its parent.
- Expand: Expands a given item.
- Collapse: Collapses a given item.
- Select: Selects the specified items.
Bound UnityEvent Handlers
- OnItemsBeginDrag: Called when items begin to be dragged.
- OnItemDragEnter: Called when an item drag enters the view.
- OnItemDragLeave: Called when an item drag leaves the view.
- OnItemsDrag: Called when items are being dragged.
- OnItemsSetLastChild: Called to set the last child during drag-and-drop.
- OnItemsSetNextSibling: Called to set the next sibling during drag-and-drop.
- OnItemsSetPrevSibling: Called to set the previous sibling during drag-and-drop.
- OnItemsCancelDrop: Called to cancel the drop operation.
- OnItemsBeginDrop: Called when items begin to be dropped.
- OnItemsDrop: Called when items are dropped.
- OnItemsEndDrag: Called when items finish being dragged.
- OnItemsRemoved: Called when items are removed.
- OnItemBeginEdit: Called when an item begins editing.
- OnItemEndEdit: Called when an item ends editing.
- OnItemHold: Called when an item is held.
- OnItemClick: Called when an item is clicked.
- OnItemDoubleClick: Called when an item is double-clicked.
- OnHold: Called when the view is held.
- OnClick: Called when the view is clicked.
Example Usage
using Battlehub.RTEditor.ViewModels;
using System.Collections.Generic;
using UnityWeld.Binding;

[Binding]
public class MyHierarchicalDataViewModel : HierarchicalDataViewModel<MyItemType>
{
    public override IEnumerable<MyItemType> GetChildren(MyItemType parent)
    {
        // Return children of the parent item
    }

    public override void OnContextMenu(List<MenuItemViewModel> menuItems)
    {
        // Add custom menu items
        menuItems.Add(new MenuItemViewModel
        {
            Path = "Custom Command",
            Action = cmd => Debug.Log("Custom command executed")
        });
    }

    protected override void OnSelectedItemsChanged(IEnumerable<MyItemType> unselectedObjects, IEnumerable<MyItemType> selectedObjects)
    {
        // Handle selection change
    }
}
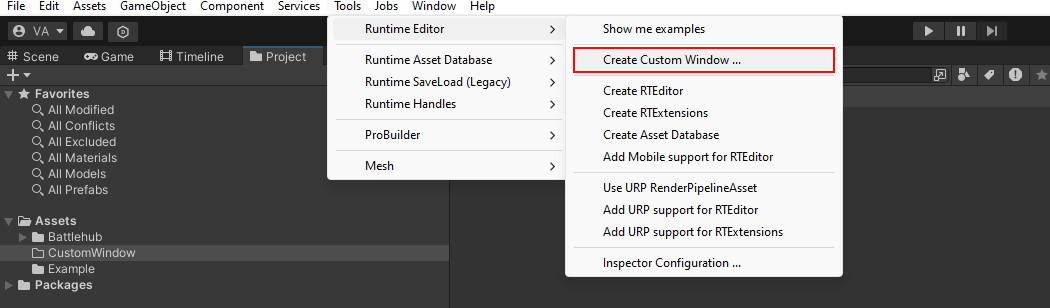
Custom windows
To create a custom window, follow these steps:
Click Tools -> Runtime Editor -> Create Custom Window
Enter the Name
- Enter
MyCustomWindow.prefaband click Save.
- Enter the Namespace
- Enter
MyNamespacenamespace and click OK.
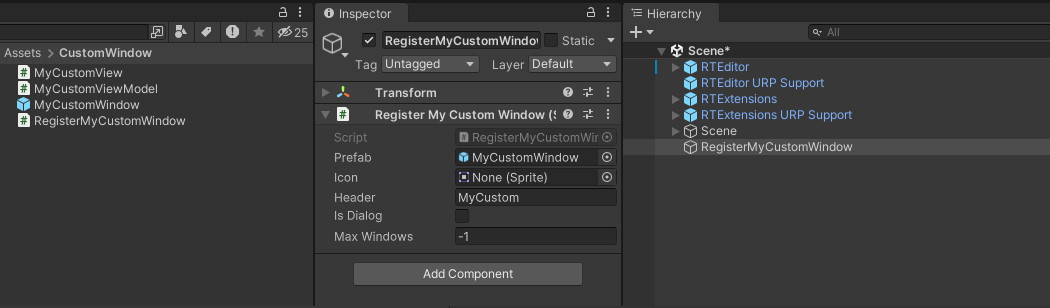
- Add RegisterMyCustomWindow Component
- Add the
RegisterMyCustomWindowcomponent created in step 1 to a GameObject in the scene.
- Drag & Drop Prefab
- Drag & drop
MyCustomWindow.prefabto the Prefab field of theRegisterMyCustomWindowscript.
- Click Play
- Click Play in the Unity Editor.
- Open Custom Window
- You should be able to open the custom window using the main menu.

Extending Existing Windows
There are several possible approaches for extending existing windows in the Runtime Editor.
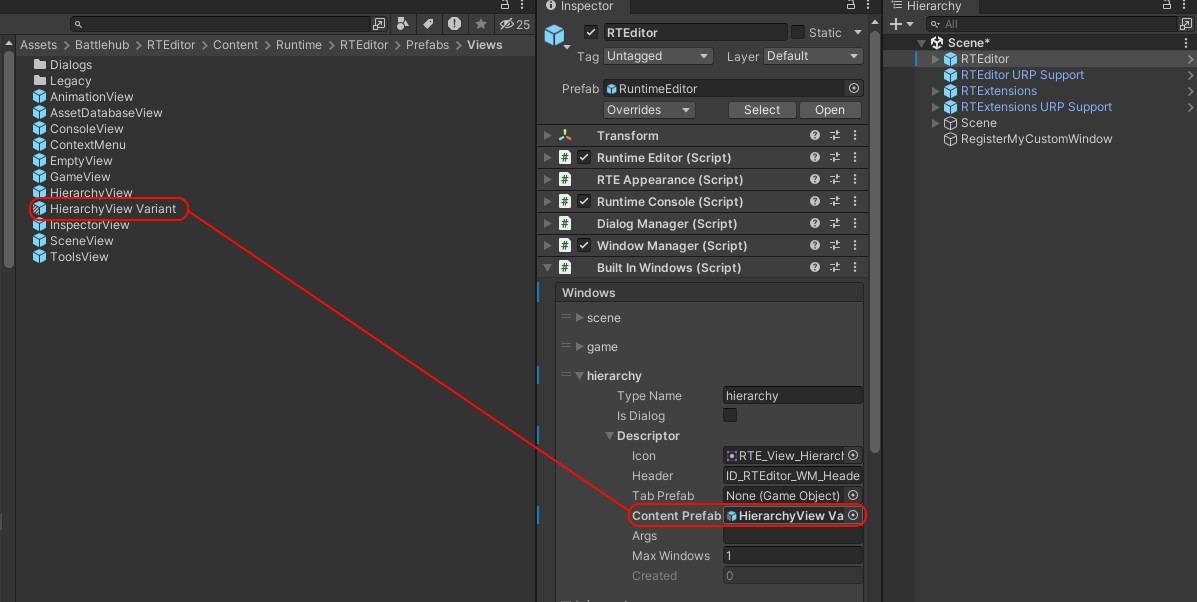
1. Override the Window Prefab
First, locate the window prefab you want to override or extend. Create a prefab variant and set the corresponding field in the BuiltInWindows component to your custom window.
2. Override Programmatically Using Layout Extension
You can also achieve this programmatically using a LayoutExtension.
using Battlehub.RTEditor;
using UnityEngine;

public class MyLayoutExtension : LayoutExtension
{
    [SerializeField]
    private GameObject m_myHierarchyWindow;

    protected override void OnRegisterWindows(IWindowManager wm)
    {
        wm.OverrideWindow(BuiltInWindowNames.Hierarchy,
            new WindowDescriptor { ContentPrefab = m_myHierarchyWindow });
    }
}
3. Override ViewModel or View Using RuntimeWindowExtension and ReplaceWith Method
You can override the ViewModel or View of a window using a RuntimeWindowExtension and the ReplaceWith method.
using Battlehub.RTCommon;
using Battlehub.RTEditor.ViewModels;

public class ExtendHierarchyWindow : RuntimeWindowExtension
{
    public override string WindowTypeName => BuiltInWindowNames.Hierarchy;

    protected override void Extend(RuntimeWindow window)
    {
        ViewModelBase.ReplaceWith<HierarchyViewModelWithContextMenu>(window);
    }
}
using Battlehub.RTEditor.ViewModels;
using System.Collections.Generic;
using UnityEngine;
using UnityWeld.Binding;

namespace Battlehub.RTEditor.Examples.Scene10
{

    [Binding]
    public class HierarchyViewModelWithContextMenuExample : HierarchyViewModel
    {
        protected override void OnContextMenu(List<MenuItemViewModel> menuItems)
        {
            base.OnContextMenu(menuItems);
            menuItems.Clear();

            MenuItemViewModel myCommand = new MenuItemViewModel
            {
                Path = "My Context Menu Cmd", Command = "My Cmd Args"
            };
            myCommand.Action = MenuCmd;
            myCommand.Validate = ValidateMenuCmd;
            menuItems.Add(myCommand);
        }

        private void ValidateMenuCmd(MenuItemViewModel.ValidationArgs args)
        {
            if (!HasSelectedItems)
            {
                args.IsValid = false;
            }
        }

        private void MenuCmd(string arg)
        {
            Debug.Log($"My Context Menu Command with {arg}");
        }
    }
}
Note
You can combine the above approaches.Note
Most of the runtime editor windows follow the architecture described in the window section.Note
For more examples, see Scene10 - Extending Context Menu in the Example Scenes section.
Overriding the Default Layout
To override the default layout, follow these steps:
Create a Script Derived from LayoutExtension:
Define a new script that inherits fromLayoutExtension.Override GetLayoutInfo Method:
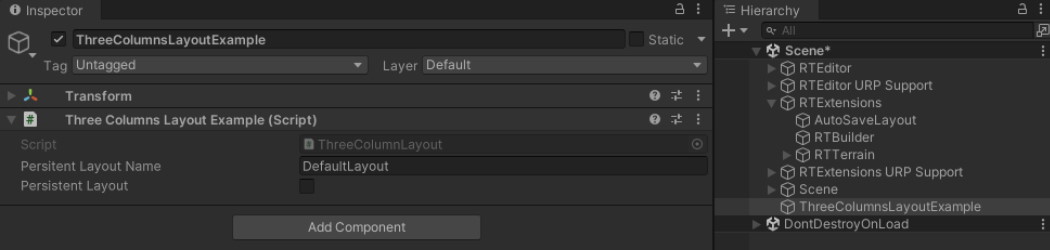
Implement theGetLayoutInfomethod to specify the custom layout.Add Script to GameObject:
Create a new empty GameObject in your scene and attach theThreeColumnsLayoutExamplescript to it.
Example
Here is an example script that creates a three-column layout (inspector, scene, hierarchy):
using Battlehub.UIControls.DockPanels;

namespace Battlehub.RTEditor.Examples.Layout
{
    /// <summary>
    /// Creates three columns layout (inspector, (scene, hierarchy))
    /// </summary>
    public class ThreeColumnsLayoutExample : LayoutExtension
    {
        protected override LayoutInfo GetLayoutInfo(IWindowManager wm)
        {
            LayoutInfo scene = wm.CreateLayoutInfo(BuiltInWindowNames.Scene);
            scene.IsHeaderVisible = true;

            LayoutInfo hierarchy = wm.CreateLayoutInfo(BuiltInWindowNames.Hierarchy);
            LayoutInfo inspector = wm.CreateLayoutInfo(BuiltInWindowNames.Inspector);

            // Defines a region divided into two equal parts (ratio 1 / 2)
            LayoutInfo sceneAndHierarchy =
                LayoutInfo.Horizontal(scene, hierarchy, ratio: 1/2.0f);

            // Defines a region divided into two parts
            // 1/3 for the inspector and 2/3 for the scene and hierarchy)
            LayoutInfo layoutRoot =
                LayoutInfo.Horizontal(inspector, sceneAndHierarchy, ratio: 1/3.0f);

            return layoutRoot;
        }
    }
}
Note !!!
Make sure to remove conflicting layout extensions (like AutoSaveLayout).

Note
For examples, see
Scene1 - Minimal,
Scene2 - Minimal Mobile,
Scene4 - Multiple Scenes,
Scene5 - Layout SaveLoad
LayoutInfo Methods
The LayoutInfo class provides three main methods to construct various types of layouts. These methods allow you to create complex layouts by splitting parent containers or grouping windows into tabs. Here's a description of each method:
Vertical Split
The Vertical method splits the parent container into two parts: one on top of the other. The specified ratio determines the size of the parts. A smaller ratio results in a smaller upper part.
public static LayoutInfo Vertical(LayoutInfo top, LayoutInfo bottom, float ratio = 0.5f)
{
    return new LayoutInfo(true, top, bottom, ratio);
}
Horizontal Split
The Horizontal method splits the parent container into two parts: one next to the other. The specified ratio determines the size of the parts. A smaller ratio results in a smaller left part.
public static LayoutInfo Horizontal(LayoutInfo left, LayoutInfo right, float ratio = 0.5f)
{
    return new LayoutInfo(false, left, right, ratio);
}
Tab Group
The Group method does not split the parent container. Instead, it creates a tab group, grouping multiple LayoutInfo instances into tabs within the same container.
public static LayoutInfo Group(params LayoutInfo[] tabGroup)
{
    return new LayoutInfo(tabGroup);
}
Vertical Split Example
Splitting a container into a scene view on top and a hierarchy view on the bottom with a 70% and 30% ratio respectively.
LayoutInfo layout = LayoutInfo.Vertical(sceneViewLayout, hierarchyViewLayout, 0.7f);
Horizontal Split Example
Splitting a container into an inspector view on the left and a scene view on the right with a 30% and 70% ratio respectively.
LayoutInfo layout = LayoutInfo.Horizontal(inspectorViewLayout, sceneViewLayout, 0.3f);
Tab Group Example
Grouping an inspector view and a console view into a single tab group.
LayoutInfo layout = LayoutInfo.Group(inspectorViewLayout, consoleViewLayout);
Overriding Scene Parameters
- Create the Script: Save the below code in a new C# script named
ScenesSetupExample.cs. - Attach the Script: Add the
ScenesSetupExamplescript to a new GameObject in your scene.
Example
using Battlehub.RTCommon;
using Battlehub.RTHandles;
using UnityEngine;

namespace Battlehub.RTEditor.Examples.SceneSetup
{
    /// <summary>
    /// This extension initializes 2D scene window
    /// </summary>
    public class SceneSetupExample : RuntimeWindowExtension
    {
        /// <summary>
        /// Type of window to be extended
        /// </summary>
        public override string WindowTypeName => BuiltInWindowNames.Scene;

        protected override void Extend(RuntimeWindow window)
        {
            // Get a reference to the IRuntimeSceneComponent of the window
            IRuntimeSceneComponent sceneComponent =
            window.IOCContainer.Resolve<IRuntimeSceneComponent>();

            // This is the point the camera looks at and orbits around
            sceneComponent.Pivot = Vector3.zero;

            // Switch the scene component and scene camera to orthographic mode
            sceneComponent.IsOrthographic = true;

            // Disable scene gizmo
            sceneComponent.IsSceneGizmoEnabled = false;

            // Disable rotation
            sceneComponent.CanRotate = false;

            // Disable free move
            sceneComponent.CanFreeMove = false;

            // Prevent camera position changes when zooming in and out
            sceneComponent.ChangeOrthographicSizeOnly = true;

            // Set initial orthographic size
            sceneComponent.OrthographicSize = 5.0f;

            // Set camera position according to window.Args
            const float distance = 100;
            sceneComponent.CameraPosition = -Vector3.forward * distance;
        }
    }
}
Explanation
- WindowTypeName: Specifies the type of window to be extended. In this case, it is set to
BuiltInWindowNames.Scene. - Extend Method: Contains the logic to configure the scene window. It sets various properties of the
IRuntimeSceneComponent
to customize the scene view, such as setting the camera to orthographic mode, disabling certain features, and setting the initial camera position and size.
Overriding Tools Panel
To override the tools panel in the runtime editor, follow these steps:
- Create a script named
ToolsPanelOverride. - Create a new GameObject and add the
ToolsPanelOverridecomponent to it. - Set the
Tools Prefabfield in the Inspector.
Here's an example script demonstrating how to override the tools panel:
using Battlehub.RTEditor;
using UnityEngine;

public class ToolsPanelOverride : LayoutExtension
{
    [SerializeField]
    private Transform m_toolsPrefab = null;

    protected override void OnBeforeBuildLayout(IWindowManager wm)
    {
        wm.OverrideTools(m_toolsPrefab);
    }
}
Note
The original tools view can be found in: Assets/Battlehub/RTEditor/Content/Runtime/RTEditor/Prefabs/Views/ToolsView.prefab
Setting ui scale
Overriding UI Scale
To override the UI scale in the runtime editor, follow these steps:
- Create a script named
UIScaleOverride. - Create a new GameObject and add the
UIScaleOverridecomponent to it. - Set the desired scale in the Inspector.
Example Script
Here's an example script demonstrating how to override the UI scale:
using Battlehub.RTCommon;
using Battlehub.RTEditor;
using UnityEngine;

public class UIScaleOverride : LayoutExtension
{
    [SerializeField]
    private float Scale = 2;

    protected override void OnInit()
    {
        ISettingsComponent settings = IOC.Resolve<ISettingsComponent>();
        settings.UIScale = Scale;
    }
}
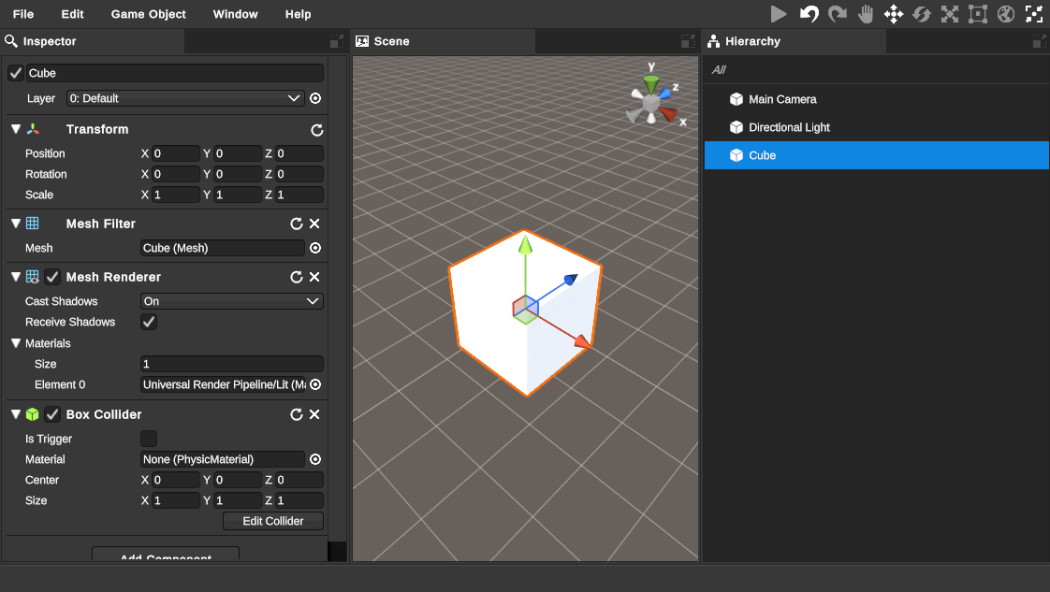
Before UI Scale Override
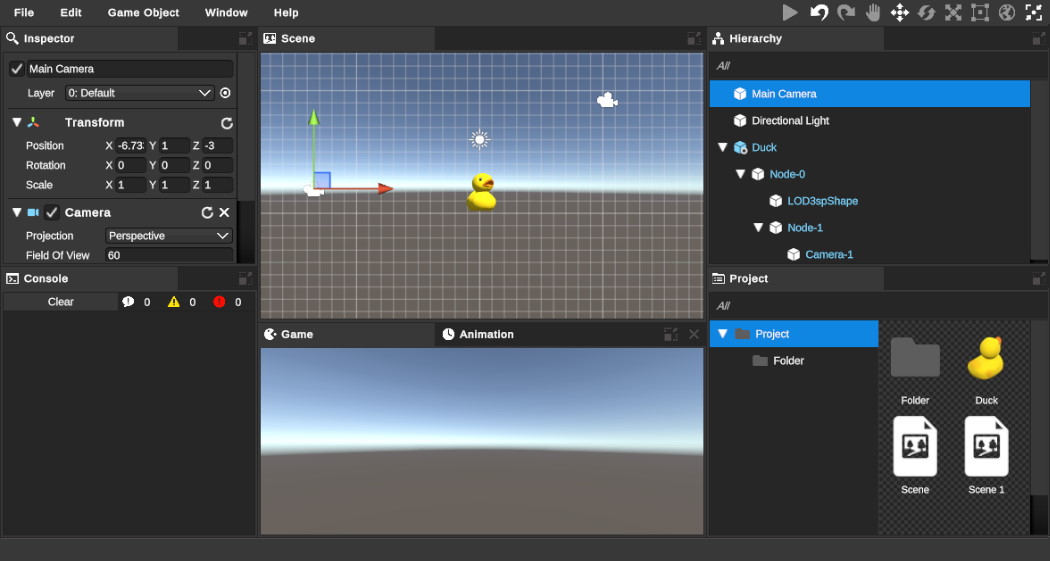
After UI Scale Override
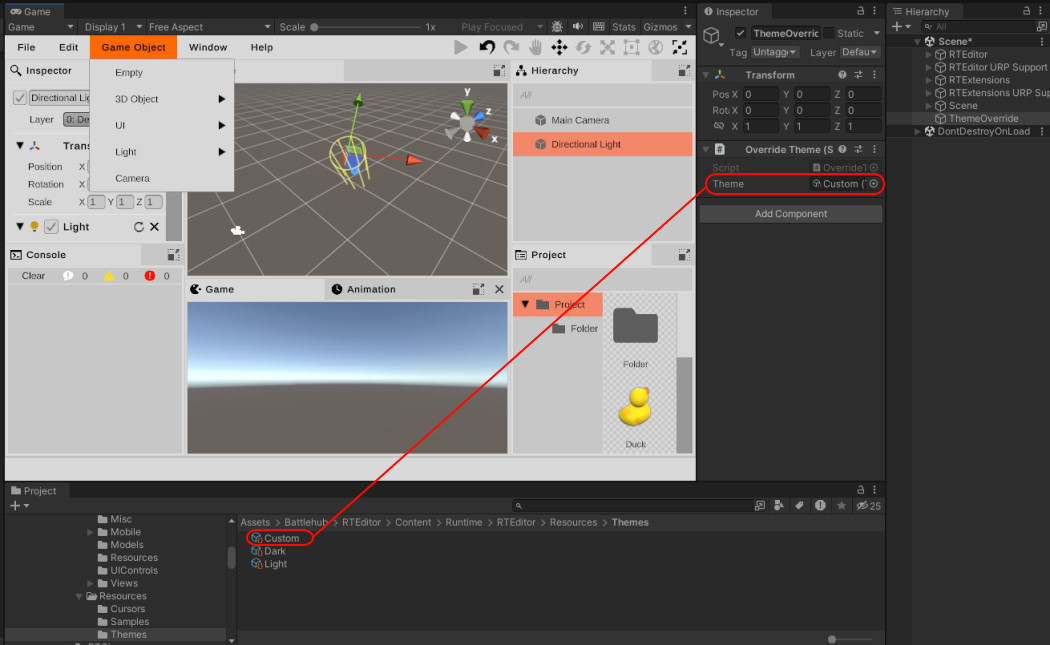
Overriding the Theme
To override the theme in the runtime editor, follow these steps:
- Create a script named
OverrideTheme. - Create a new GameObject and add the
OverrideThemecomponent to it. - Assign a ThemeAsset to the
m_themefield in the Inspector.
Example Script
Here's an example script demonstrating how to override the theme:
using Battlehub.RTCommon;
using UnityEngine;

namespace Battlehub.RTEditor.Demo
{
    public class OverrideTheme : EditorExtension
    {
        [SerializeField]
        private ThemeAsset m_theme;

        protected override void OnInit()
        {
            ISettingsComponent settings = IOC.Resolve<ISettingsComponent>();
            settings.SelectedTheme = m_theme;
        }
    }
}
Inspector View
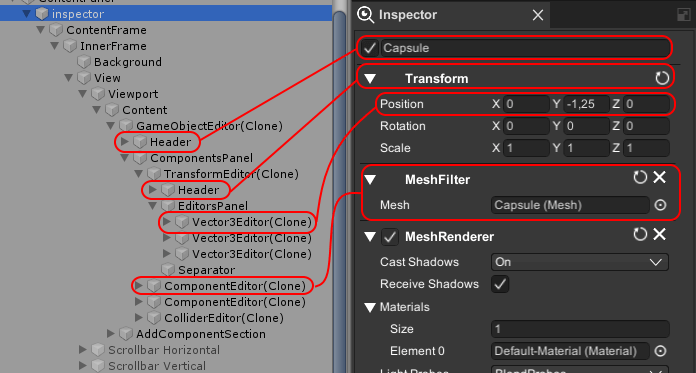
The main purpose of the inspector is to create different editors depending on the type of selected object and its components. Here is a general idea of what is happening:
- GameObject Selection: When the user selects a GameObject, the inspector creates a GameObject editor.
- Component Editors Creation: The GameObject editor creates component editors for each component attached to the selected GameObject.
- Property Editors Creation: Each component editor creates property editors for the properties of the component.
Inspector Editors
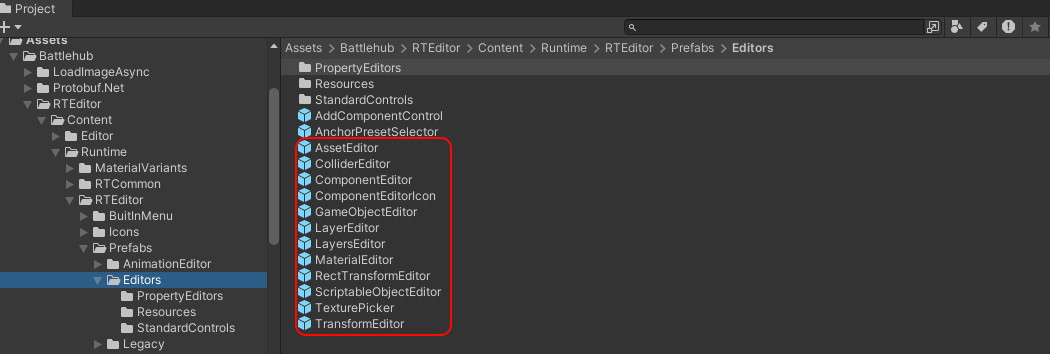
In the Assets/Battlehub/RTEditor/Content/Runtime/RTEditor/Prefabs/Editors folder, you can find various editor prefabs like GameObjectEditor, AssetEditor, LayerEditor, and MaterialEditor.
These editors are used by the inspector to create specific editing ui based on the selected object's type and its components.
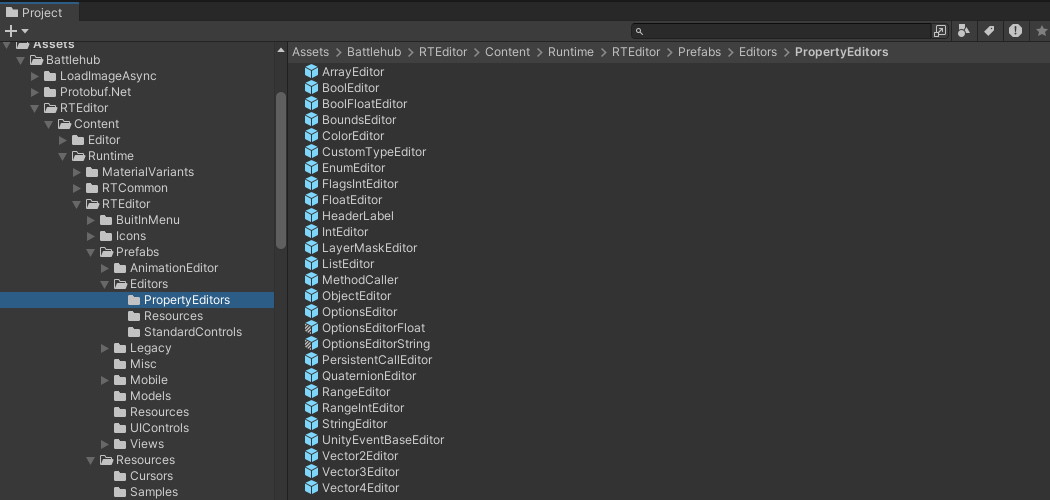
Property Editors
Property editors, created by component editors, are located in the Assets/Battlehub/RTEditor/Content/Runtime/RTEditor/Prefabs/Editors/PropertyEditors folder.
These editors provide specific ui for editing individual properties of components within the inspector.
Inspector Configuration
To configure the editors used by the inspector, follow these steps:
Click
Tools -> Runtime Editor -> Inspector Configuration.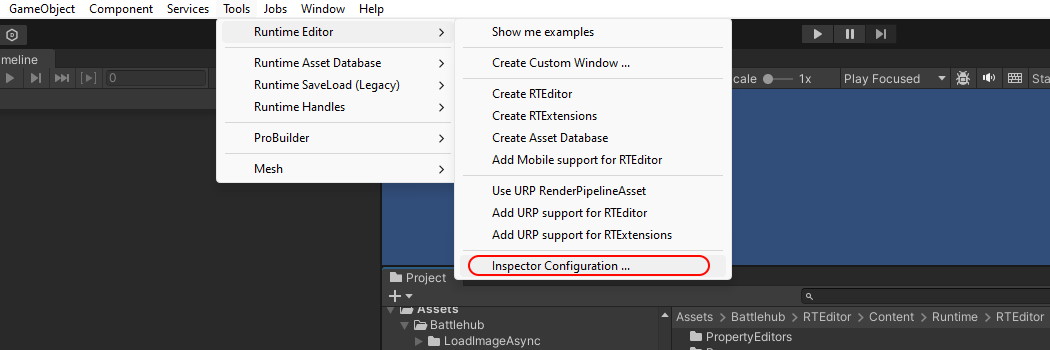
The configuration window has five sections:
- Object Editors: Select which editor to use for Game Objects and Asset Editors.
- Property Editors: Select which editors to use for component properties.
- Material Editors: Select which editors to use for materials.
- Standard Component Editors: Select which editors to use for standard components.
- Script Editors: Select which editors to use for scripts.
After selecting and enabling the desired component editors, click the
Save Editors Mapbutton.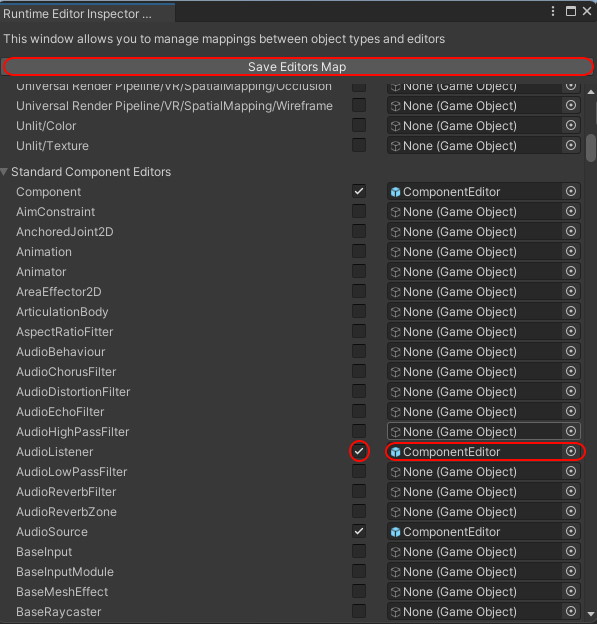
Register Editors Programatically
To register property editors programmatically, you need to create a script that defines and registers your custom property editors. Below is an example demonstrating how to achieve this:
using Battlehub.RTCommon;
using Battlehub.RTEditor;
using UnityEngine;

public class RegisterPropertyEditorsExample : EditorExtension
{
    [SerializeField]
    private GameObject m_vector3Editor = null;

    [SerializeField]
    private GameObject m_vector2Editor = null;

    protected override void OnInit()
    {
        base.OnInit();

        IEditorsMap editorsMap = IOC.Resolve<IEditorsMap>();
        if (m_vector3Editor != null)
        {
            editorsMap.RemoveMapping(typeof(Vector3));
            editorsMap.AddMapping(typeof(Vector3), m_vector3Editor, true, true);
            EnableStyling(m_vector3Editor);
        }

        if (m_vector2Editor != null)
        {
            editorsMap.RemoveMapping(typeof(Vector2));
            editorsMap.AddMapping(typeof(Vector2), m_vector2Editor, true, true);
            EnableStyling(m_vector2Editor);
        }
    }
}
Steps to Register Property Editors Programmatically
Create a New Script: Create a new C# script, for example,
RegisterPropertyEditorsExample.cs.Implement the Script: Implement the script as shown above, registering your custom property editors.
Attach the Script to a GameObject: Create a new GameObject in your scene and attach the
RegisterPropertyEditorsExamplescript to it
To register a custom component editor programmatically, you can use a similar approach to the one used for registering property editors. Below is an example demonstrating how to achieve this:
using Battlehub.RTCommon;
using Battlehub.RTEditor;
using UnityEngine;

public class CustomComponentEditorInit : EditorExtension
{
    [SerializeField]
    private GameObject m_terrainComponentEditor = null;

    protected override void OnInit()
    {
        base.OnInit();

        IEditorsMap editorsMap = IOC.Resolve<IEditorsMap>();
        if (m_terrainComponentEditor != null)
        {
            if (!editorsMap.HasMapping(typeof(Terrain)))
            {
                editorsMap.AddMapping(typeof(Terrain),
                    m_terrainComponentEditor, enabled: true, isPropertyEditor: false);
            }
        }
    }
}
Component Properties Visiblity
To select the properties displayed by the component editor, you need to create a class that inherits from ComponentDescriptorBase<>. Implement the GetProperties method to return PropertyDescriptors for all properties that will be present in the component editor UI.
For example, suppose you have the following component, and you want to display Field1, Property1, and a button that will call Method(). Field2 and Property2 must stay hidden.
public class MyComponent : MonoBehaviour
{
    public string Field1;

    public string Field2;

    public string Property1
    {
        get;
        set;
    }

    public string Property2
    {
        get;
        set;
    }

    public void Method()
    {
        Debug.Log("Method");
    }
}
To achieve this, create the following component descriptor:
using Battlehub.RTEditor;
using Battlehub.Utils;
using UnityEngine;

public class MyComponentDescriptor : ComponentDescriptorBase<MyComponent>
{
    public override PropertyDescriptor[] GetProperties(ComponentEditor editor, object converter)
    {
        var field1 = Strong.MemberInfo((MyComponent x) => x.Field1);
        var property1 = Strong.MemberInfo((MyComponent x) => x.Property1);
        var method = Strong.MethodInfo((MyComponent x) => x.Method());

        return new[]
        {
            new PropertyDescriptor("My Field", editor.Components, field1),
            new PropertyDescriptor("My Property", editor.Components, property1),
            new PropertyDescriptor("Click Me!", editor.Components, method),
        };
    }
}
And enable the ComponentEditor using the Inspector Configuration Window.
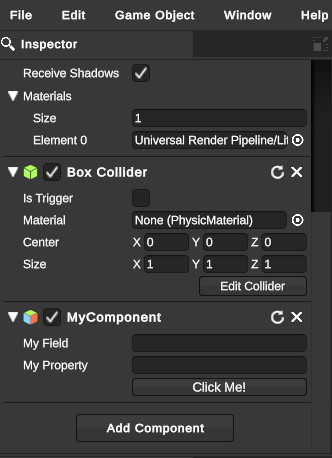
Here is more complex example of a TransformComponentDescriptor:
using UnityEngine;
using System.Reflection;
using Battlehub.Utils;
using Battlehub.RTCommon;

namespace Battlehub.RTEditor
{
    public class TransformComponentDescriptor : ComponentDescriptorBase<Transform>
    {
        public override object CreateConverter(ComponentEditor editor)
        {
            object[] converters = new object[editor.Components.Length];
            Component[] components = editor.Components;
            for (int i = 0; i < components.Length; ++i)
            {
                Transform transform = (Transform)components[i];
                if (transform != null)
                {
                    converters[i] = new TransformPropertyConverter
                    {
                        ExposeToEditor = transform.GetComponent<ExposeToEditor>()
                    };
                }
            }
            return converters;
        }

        public override PropertyDescriptor[] GetProperties(
            ComponentEditor editor, object converter)
        {
            object[] converters = (object[])converter;

            MemberInfo position = Strong.PropertyInfo(
                (Transform x) => x.localPosition, "localPosition");
            MemberInfo positionConverted = Strong.PropertyInfo(
                (TransformPropertyConverter x) => x.LocalPosition, "LocalPosition");
            MemberInfo rotation = Strong.PropertyInfo(
                (Transform x) => x.localRotation, "localRotation");
            MemberInfo rotationConverted = Strong.PropertyInfo(
                (TransformPropertyConverter x) => x.LocalEuler, "LocalEulerAngles");
            MemberInfo scale = Strong.PropertyInfo(
                (Transform x) => x.localScale, "localScale");
            MemberInfo scaleConverted = Strong.PropertyInfo(
                (TransformPropertyConverter x) => x.LocalScale, "LocalScale");

            return new[]
            {
                new PropertyDescriptor("Position", converters, positionConverted, position),
                new PropertyDescriptor("Rotation", converters, rotationConverted, rotation),
                new PropertyDescriptor("Scale", converters, scaleConverted, scale)
            };
        }
    }
}
Note
TransformPropertyConverter is used to convert a quaternion to Euler angles, enabling the use of Vector3Editor instead of QuaternionEditor.Note
The remaining built-in component descriptors can be found in theAssets/Battlehub/RTEditor/Runtime/RTEditor/Editors/ComponentDescriptorsfolder.Note
To save a new component, you should create a Surrogate class for it. See the Serializer Extensions section for details.
Customizing Component Editor Header
To customize the header of a component editor, you may want to override the GetHeaderDescriptor method. This allows you to specify various aspects of the header, such as its display name, the visibility of certain buttons, and whether to show an icon.
Here is an example of how to override the GetHeaderDescriptor method in a component descriptor:
public class MyComponentDescriptor : ComponentDescriptorBase<MyComponent>
{
    public override HeaderDescriptor GetHeaderDescriptor(IRTE editor)
    {
        // Customize the header descriptor as needed
        return new HeaderDescriptor(
            displayName: "My Custom Component",
            showExpander: true,
            showResetButton: true,
            showEnableButton: true,
            showRemoveButton: true,
            showIcon: true,
            icon: null
        );
    }
}
HeaderDescriptor Structure
The HeaderDescriptor struct allows you to configure the appearance and functionality of the component editor's header. It has the following properties:
- DisplayName: The display name of the component.
- ShowExpander: Determines whether to show the expander toggle (usually used to collapse or expand the component's properties).
- ShowResetButton: Determines whether to show the reset button.
- ShowEnableButton: Determines whether to show the enable/disable button.
- ShowRemoveButton: Determines whether to show the remove button.
- Icon: The icon to be displayed in the header.
- ShowIcon: Determines whether to show the icon.
Localization
To localize your application, follow these steps to create and load string resources.
- Create a file named
My.StringResources.en-US.xmlwith the following format and place it in theResourcesfolder:
<?xml version="1.0" encoding="utf-8"?>
<StringResources xmlns:xsd="http://www.w3.org/2001/XMLSchema" xmlns:xsi="http://www.w3.org/2001/XMLSchema-instance">
    <Resources>
        <!-- Example String Resource -->
        <StringResource id="ID_String" value="Localized String"/>
    </Resources>
</StringResources>
- Load the string resources using the following code:
ILocalization lc = IOC.Resolve<ILocalization>();
lc.LoadStringResources("My.StringResources");
- Retrieve localized strings using the
GetStringmethod:
var localizedString = lc.GetString("ID_String");
Built-in String Resources
Runtime Editor includes the following built-in string resources:
RTBuilder.StringResources.en-USRTDeformer.StringResources.en-USRTEditor.StringResources.en-USRTTerrain.StringResources.en-US
Note
Locale can be changed using following codelc.Locale = "en-US";This will work provided that string resources files with the corresponding prefix exist.
UI Controls
Dock Panel Control
https://rteditor.battlehub.net/v350/manual/dock-panels.html
Tree View Control
https://rteditor.battlehub.net/v350/manual/vtv.html
Menu Control
https://rteditor.battlehub.net/v350/manual/menu-control.html
Runtime Transform Handles
Runtime Transform Handles are the runtime 3D controls used to manipulate items in the scene. There are three built-in transform tools to position, rotate, and scale objects via the transform component. Another special built-in tool, the rect tool, allows you to move and change the scale of game objects.
Supplementary controls such as the scene gizmo and grid help to change the viewing angle and projection mode, identify selected objects, and orientate in the scene space. Other important components include:
- Selection Component: Allows for selecting objects.
- Scene Component: Facilitates navigation within the scene.
- Handles Component: Enables changing the appearance of transform handles.
https://rteditor.battlehub.net/v350/manual/transform-handles.html
Runtime Gizmos
Runtime Gizmos are the runtime 3D controls used to manipulate items in the scene. Unlike transform handles, gizmos do not modify the transformation of objects.
Instead, they are used to modify colliders, bounding boxes, and properties of light and audio sources.
https://rteditor.battlehub.net/v350/manual/gizmos.html
Animation Editor
https://rteditor.battlehub.net/v350/manual/animation-editor.html
Runtime Editor Extensions
https://rteditor.battlehub.net/v350/manual/editor-extensions.html
Runtime Scripting
In Runtime Editor 4.4.0, support for Jint as a runtime scripting backend was added.
Jint is a JavaScript interpreter for .NET that can run on any modern .NET platform, as it supports .NET Standard 2.0 and .NET 4.6.2 targets (and later). Learn more about Jint here.
Getting Started with Runtime Scripting
- Unpack
Assets/Battlehub/3 RTEditor Scripting (Jint).unitypackage. - If you're starting with a new scene, click Tools > Runtime Editor > Create RTEditor.
- Click Tools > Runtime Editor > Add Runtime Scripting (Jint).

- Start the Runtime Editor.
- In the Project View, right-click and select Create > JintScript from the context menu.

- Create an empty GameObject.

- In the Inspector, click Add Component and type
JintScript.

- Click Play in the Runtime Editor.
- Observe
Debug.Logmessages printed byJintScriptin the console.

- You can open the script editor by double-clicking the script in the Project View.

Jint Script
A typical Jint script looks as follows:
var UnityEngine = importNamespace('UnityEngine');

var Awake = function (component) {
    UnityEngine.Debug.Log("Awake");
};

var Start = function (component) {
    UnityEngine.Debug.Log("Start");
};

var OnDestroy = function (component) {
    UnityEngine.Debug.Log("OnDestroy");
};

return {
    Awake: Awake,
    Start: Start,
    OnDestroy: OnDestroy
};
Method names correspond to the names of Unity MonoBehaviour methods. You can declare Awake, OnEnable, Start, OnDisable, Update, FixedUpdate, and OnDestroy.
There are two additional methods called by the Runtime Editor: OnRemove and OnRestore. The Runtime Editor does not immediately delete GameObjects; they remain in the undo stack until eventually destroyed, at which point the OnDestroy method is called. If you restore a GameObject from the undo/redo stack, the OnRestore method will be called.
Other methods like LateUpdate and OnApplicationQuit are currently not supported.
Declaring variables
There are four types of properties that can be exposed to the Runtime Editor and displayed in the Inspector: String, Number, Boolean, and Object.
 var UnityEngine = importNamespace('UnityEngine');
 var Log = UnityEngine.Debug.Log;

 var Start = function(component) {
     Log(this.String + "", "" + this.Number + "", "" + this.Boolean + "", "" + this.Object);
 }

 return {
     String: ""Runtime Editor"",
     Number: 2024,
     Boolean: true,
     Object: {},

     Start : Start
 };

Using UnityEngine API
Using the Unity API from a Jint script is intuitive and not much different from how it's used in C#.
However, to access methods of certain objects, you need to unwrap the object using the u(obj) method, which is a shortcut for jint.clrHelper.unwrap(obj).
See the u(rb) call in the example below and refer to the following issue for details: https://github.com/sebastienros/jint/pull/1613
  var UnityEngine = importNamespace('UnityEngine');
  var RTCommon = importNamespace('Battlehub.RTCommon');

  var GameObject = UnityEngine.GameObject;
  var PrimitiveType = UnityEngine.PrimitiveType;
  var Rigidbody = UnityEngine.Rigidbody;
  var Vector3 = UnityEngine.Vector3;

  var ExposeToEditor = RTCommon.ExposeToEditor;

  var Start = function (component) {
      var plane = GameObject.CreatePrimitive(PrimitiveType.Plane);
      plane.transform.parent = component.transform.parent;
      plane.position = Vector3.zero;
      plane.AddComponent(ExposeToEditor);

      var go = GameObject.CreatePrimitive(PrimitiveType.Cube);
      go.transform.parent = component.transform.parent;
      go.transform.position = new Vector3(0, 10, 0);
      go.AddComponent(ExposeToEditor);

      var rb =  go.AddComponent(Rigidbody);
      u(rb).AddForce(
          Vector3.right,
          UnityEngine.ForceMode.Impulse);
  }

  return {
      Start: Start
  };
  "

JintComponent.Add, JintComponent.Get
JintComponent.Add can be used to add a Jint script by name, equivalent to AddComponent.
 var UnityEngine = importNamespace('UnityEngine');
 var RTScripting = importNamespace('Battlehub.RTScripting');

 var Hello = function (arg) {
     UnityEngine.Debug.Log(""Hi "" + arg + "", nice to meet you!"")
 }

 var Start = function (component) {
     RTScripting.JintComponent.Add(component.gameObject, ""TestJintComponent"")
 }

 return {
     Start: Start,
     Hello: Hello
 };
JintComponent.Get can be used to retrieve a Jint script by name, equivalent to GetComponent.
var UnityEngine = importNamespace('UnityEngine');
var RTScripting = importNamespace('Battlehub.RTScripting');

var Start = function (component) {
    UnityEngine.Debug.Log(""I am Test Component!"");

    var otherComponent = RTScripting.JintComponent.Get(component.gameObject, ""AddJintComponent"");
    otherComponent.Call(""Hello"", ""Test Component"");
}

return {
    Start: Start
}
Create Jint Script programmatically
The following approach can be used to create Jint scripts programmatically:
private async Task CreateExampleScriptAsync(string gameObjectName, string scriptName, string scriptCode)
{
    var editor = IOC.Resolve<IRuntimeEditor>();

    // Get script path inside root folder
    var scriptPath = editor.GetRootFolderPath($"{scriptName}.js");

    // Create script asset
    await editor.CreateAssetAsync(scriptCode, scriptPath, forceOverwrite: true);

    // Create game object
    var go = CreateGameObject(gameObjectName);

    // And add it to the Scene
    editor.AddGameObjectToScene(go);

    // Add JintComponent with newly created script
    go.AddJintComponent(scriptName);
}
 string scriptCode = @"
 var UnityEngine = importNamespace('UnityEngine');

 UnityEngine.Debug.Log(""Hello World!"");
 ";

CreateExampleScript(
    gameObjectName: "Hello World",
    scriptName: "Hello World",
    scriptCode: scriptCode);
More Runtime Scripting samples
- Unpack Assets/Battlehub/3 RTEditor Scripting Demo (Jint).unitypackage.
- Click Tools > Runtime Editor > Show me examples.
- Open Scene61 - Scripting (Jint) in the Example Scenes section.

Asset Database
In Runtime Editor 4.0.0, the RTSL subsystem was replaced by the Runtime Asset Database.
For information on making the runtime editor compatible with projects created using previous versions, see the Compatibility Modes section.
The documentation for Runtime Save Load can be found here.
This section focuses on the new asset database and new API methods.
Core Methods and Events
Most of the new core project, scene, prefab, and asset management methods are defined in the IRuntimeEditor and IAssetDatabaseModel interfaces.
IRuntimeEditor and IAssetDatabaseModel Interfaces
IRuntimeEditor Interface
The IRuntimeEditor interface extends IRTE and IAssetDatabaseModel to provide a comprehensive set of methods and properties for managing projects, scenes, and assets in the Runtime Editor. Key functionalities include:
Project Management:
Create, load, delete, and list projects.
Check if a project type is supported.
Handle project-related events.
Scene Management:
Create new scenes and save scenes with specified parameters.
Handle scene-related events.
Asset Management:
Create assets from binary data, text, or Unity objects.
Handle asset-related events.
Window Management:
Create or activate editor windows.
Reset to default layout.
IAssetDatabaseModel Interface
The IAssetDatabaseModel interface provides methods and events for managing assets within the runtime editor. It includes:
Event Handling:
Events for project loading, unloading, asset creation, deletion, and modification.
Events for scene initialization, asset instantiation, and changes in asset selection.
Asset Operations:
Methods to load, save, and delete assets.
Methods to move, duplicate, and instantiate assets.
Methods to open, close, and edit assets and prefabs.
Methods to manage asset folders.
Utility Methods:
Methods to add and remove runtime serializable types.
Methods to add and remove extensions and external asset loaders.
Methods to check various conditions related to assets, instances, and prefabs.
Key Methods and Properties
IRuntimeEditor
Task<ProjectListEntry[]> GetProjectsAsync();
Task<ProjectListEntry> CreateProjectAsync(string projectPath);
Task<ProjectListEntry> DeleteProjectAsync(string projectPath);
void NewScene(bool confirm = true);
void SaveScene();
void SaveSceneAs();
Task SaveCurrentSceneAsync(ID folderID, string name);
Task SaveCurrentSceneAsync(string path = null);
Task CreateAssetAsync(byte[] binaryData, string path, bool forceOverwrite = false, bool select = true);
Task CreateAssetAsync(string text, string path, bool forceOverwrite = false, bool select = true);
Task CreateAssetAsync(UnityObject obj, string path = null, bool forceOverwrite = false, bool? includeDependencies = null, bool? variant = null, bool select = true);
IAssetDatabaseModel
Task LoadProjectAsync(string projectID, string version = null);
Task UnloadProjectAsync();
Task<ID> CreateFolderAsync(string path);
Task<ID> CreateAssetAsync(object obj, string path, bool variant = false, bool extractSubassets = false);
Task<ID> ImportExternalAssetAsync(ID folderID, object key, string loaderID, string desiredName);
Task<ID> ImportExternalAssetAsync(ID folderID, ID assetID, object key, string loaderID, string desiredName);
Task InitializeNewSceneAsync();
Task UnloadAllAndClearSceneAsync();
Task SaveAssetAsync(ID assetID);
Task UpdateThumbnailAsync(ID assetID);
Task MoveAssetsAsync(IReadOnlyList<ID> assetIDs, IReadOnlyList<string> toPaths);
Task DuplicateAssetsAsync(IReadOnlyList<ID> assetIDs, IReadOnlyList<string> toPaths);
Task DeleteAssetsAsync(IReadOnlyList<ID> assetIDs);
Task SelectPrefabAsync(GameObject instance);
Task OpenPrefabAsync(GameObject instance);
Task ClosePrefabAsync();
Task OpenAssetAsync(ID assetID);
Task<InstantiateAssetsResult> InstantiateAssetsAsync(ID[] assetIDs, Transform parent = null);
Task DetachAsync(GameObject[] instances, bool completely);
Task SetDirtyAsync(Component component);
Task DuplicateAsync(GameObject[] instances);
Task ReleaseAsync(GameObject[] instances);
Task ApplyChangesAsync(GameObject instance);
Task ApplyToBaseAsync(GameObject instance);
Task RevertToBaseAsync(GameObject instance);
Task<byte[]> SerializeAsync(object asset);
Task<object> DeserializeAsync(byte[] data, object target = null);
Task<T> GetValueAsync<T>(string key);
Task SetValueAsync<T>(string key, T obj);
Task DeleteValueAsync<T>(string key);
IAssetDatabaseModel vs IRuntimeEditor Interface
var assetDatabase = IOC.Resolve<IAssetDatabaseModel>();
var runtimeEditor = IOC.Resolve<IRuntimeEditor>();
These two interfaces can be used almost interchangeably.
IAssetDatabaseModel has fewer methods, but it might be a good idea to use it if you want some parts of your code to run without opening the runtime editor.
Apart from the runtime editor itself, there are two implementations of the IAssetDatabaseModel interface: AssetDatabaseModel and AssetDatabaseModelOverRTSL (which exists for compatibility with projects created using the Runtime Save Load subsystem in previous runtime editor versions).
- The
AssetDatabaseModelis a wrapper for the Runtime Asset Database. - The
AssetDatabaseModelOverRTSLis a wrapper for RTSL.
Projects Root Folder Path
You can set the projects root folder in two ways:
By updating the
Project Root Folder Pathfield of the Runtime Editor (script) (see RuntimeEditor.prefab/Runtime Editor (Script)/Extra Settings/Projects Root Folder Path).Programmatically:
using Battlehub.RTEditor;
using Battlehub.RTCommon;

public class SetRootFolderExt : EditorExtension
{
    protected override void OnInit()
    {
        var editor = IOC.Resolve<IRuntimeEditor>();
        editor.ProjectsRootFolderPath = @"C:\Runtime Editor Projects";
    }
}
Manage Projects
The following example demonstrates how to create, open, close, and delete projects using the Runtime Editor.
The projects are stored in Application.persistentDataPath folder

A typical project folder looks like this:
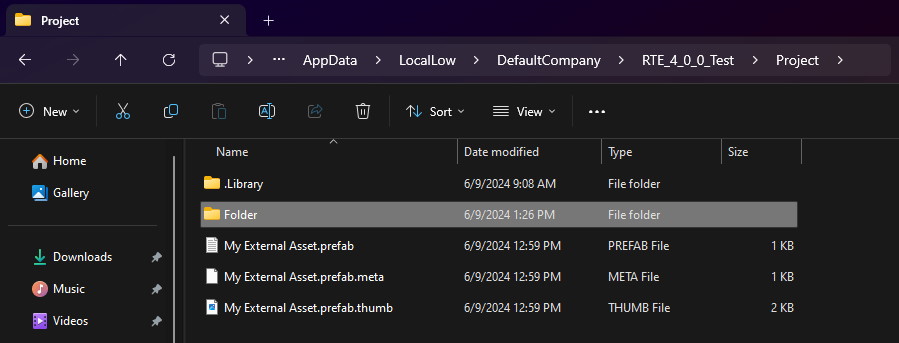
using Battlehub.RTCommon;
using Battlehub.UIControls.MenuControl;
using System;
using UnityEngine;

namespace Battlehub.RTEditor.Examples.Scene31
{
    /// <summary>
    /// Example on how to create, open, close, and delete projects.
    /// </summary>
    [MenuDefinition]
    public class ProjectManagementExampleMenu : EditorExtension
    {
        private IWindowManager m_wm;
        private IRuntimeEditor m_editor;

        protected override void OnInit()
        {
            base.OnInit();

            m_wm = IOC.Resolve<IWindowManager>();
            m_editor = IOC.Resolve<IRuntimeEditor>();
            m_editor.BeforeLoadProject += OnBeforeLoadProject;
            m_editor.LoadProject += OnLoadProject;
            m_editor.BeforeUnloadProject += OnBeforeUnloadProject;
            m_editor.UnloadProject += OnUnloadProject;
        }

        protected override void OnCleanup()
        {
            base.OnCleanup();
            m_editor.BeforeLoadProject -= OnBeforeLoadProject;
            m_editor.LoadProject -= OnLoadProject;
            m_editor.BeforeUnloadProject -= OnBeforeUnloadProject;
            m_editor.UnloadProject -= OnUnloadProject;
            m_editor = null;
            m_wm = null;
        }

        [MenuCommand("Example/Manage Projects")]
        public void ManageProjects()
        {
            m_wm.CreateWindow(BuiltInWindowNames.OpenProject);
        }

        [MenuCommand("Example/Create Project")]
        public void CreateProject()
        {
            m_wm.Prompt("Enter Project Name", "My Project", async (sender, args) =>
            {
                using var b = m_editor.SetBusy();
                await m_editor.CreateProjectAsync(args.Text);
            });
        }

        [MenuCommand("Example/Load Project")]
        public void OpenProject()
        {
            m_wm.Prompt("Enter Project Name", "My Project", async (sender, args) =>
            {
                using var b = m_editor.SetBusy();
                if (m_editor.IsProjectLoaded)
                {
                    await m_editor.UnloadProjectAsync();
                }
                await m_editor.LoadProjectAsync(args.Text);
            });
        }

        [MenuCommand("Example/Delete Project")]
        public void DeleteProject()
        {
            m_wm.Prompt("Enter Project Name", "My Project", async (sender, args) =>
            {
                using var b = m_editor.SetBusy();
                await m_editor.DeleteProjectAsync(args.Text);
            });
        }

        [MenuCommand("Example/Close Project")]
        public async void CloseProject()
        {
            using var b = m_editor.SetBusy();
            await m_editor.UnloadProjectAsync();
        }

        private void OnBeforeLoadProject(object sender, EventArgs e)
        {
            Debug.Log($"On Before Load {m_editor.ProjectID}");
        }

        private void OnLoadProject(object sender, EventArgs e)
        {
            Debug.Log($"On Load {m_editor.ProjectID}");
        }

        private void OnBeforeUnloadProject(object sender, EventArgs e)
        {
            Debug.Log($"On Before Unload {m_editor.ProjectID}");
        }

        private void OnUnloadProject(object sender, EventArgs e)
        {
            Debug.Log($"On Unload {m_editor.ProjectID}");
        }
    }
}
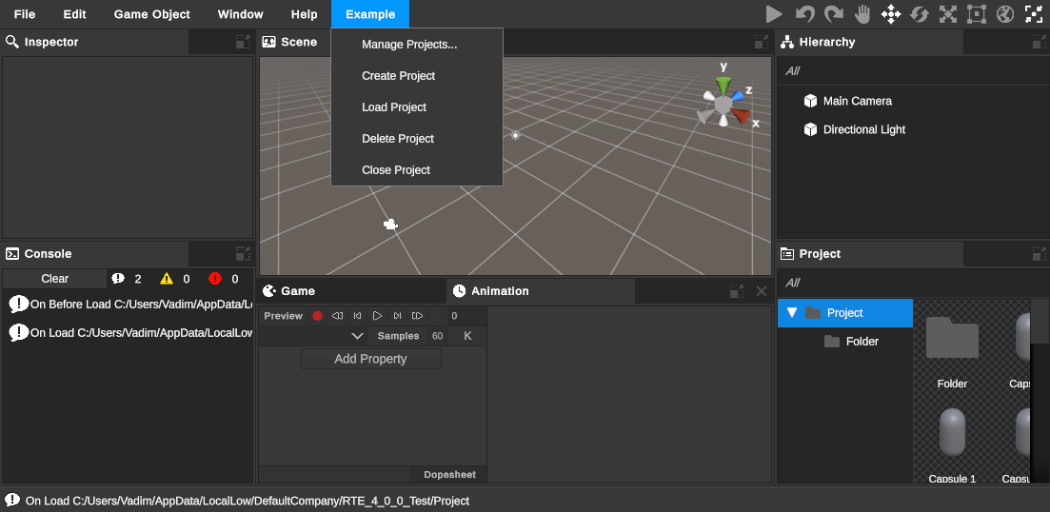
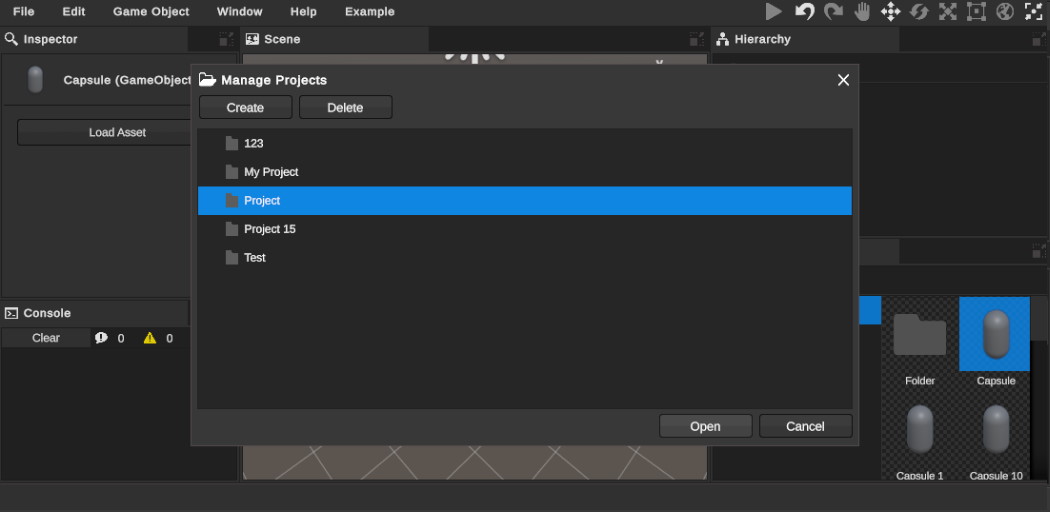
Import Export Project
Install the SharpZipLib package. In Package Manager, click on "+ Add package by name" and enter "com.unity.sharp-zip-lib"
To export or import a project you can use following methods:
private async Task ExportProjectAsync(string sourceProjectName, string archivePath)
{
    if (File.Exists(archivePath))
    {
        File.Delete(archivePath);
    }

    using (var fs = File.OpenWrite(archivePath))
    {
        var editor = IOC.Resolve<IRuntimeEditor>();
        using var b = editor.SetBusy();
        await editor.ExportProjectAsync(fs, sourceProjectName);
    }
}
private async Task ImportProjectAsync(string archivePath, string targetProjectName)
{
    using (var fs = File.OpenRead(archivePath))
    {
        var editor = IOC.Resolve<IRuntimeEditor>();
        using var b = editor.SetBusy();
        await editor.ImportProjectAsync(fs, targetProjectName);
    }
}
Create Folder
The following example demonstrates how to create folders using the IRuntimeEditor interface in the Runtime Editor.
using Battlehub.RTCommon;
using Battlehub.RTEditor;
using Battlehub.RTEditor.Models;
using Battlehub.UIControls.MenuControl;
using UnityEngine;

[MenuDefinition]
public class CreateFolderExample : EditorExtension
{
    private IRuntimeEditor m_editor;

    protected override void OnInit()
    {
        base.OnInit();

        m_editor = IOC.Resolve<IRuntimeEditor>();
        m_editor.CreateFolder += OnCreateFolder;
    }

    protected override void OnCleanup()
    {
        base.OnCleanup();
        m_editor.CreateFolder -= OnCreateFolder;
    }

    [MenuCommand("Example/Create Folder")]
    public void CreateFolder()
    {
        var wm = IOC.Resolve<IWindowManager>();
        wm.Prompt("Enter Folder Name", "New Folder", async (sender, args) =>
        {
            string newFolderName = args.Text;
            if (!m_editor.IsValidName(newFolderName))
            {
                wm.MessageBox("Error", "Folder Name is invalid");
                return;
            }

            // Use the current folder as a parent
            var parentFolderID = m_editor.CurrentFolderID;

            // Make sure that the folder path is unique
            string path = m_editor.GetUniquePath(parentFolderID, newFolderName);

            // Show busy indicator
            using var b = m_editor.SetBusy();

            await m_editor.CreateFolderAsync(path);
        });
    }

    private void OnCreateFolder(object sender, CreateFolderEventArgs e)
    {
        // A folder is a special kind of asset and has an AssetID just like real assets
        // The folder asset ID is temporary and it is different between sessions
        ID assetID = e.AssetID;

        // You can get the folder path by its ID
        var path = m_editor.GetPath(assetID);

        Debug.Log($"On Create Folder: {path}");
    }
}
Set Current Folder
The current folder is the folder selected in the project tree, whose contents are displayed in the right section of the asset database window.
using Battlehub.RTCommon;
using Battlehub.RTEditor;
using Battlehub.RTEditor.Models;
using Battlehub.UIControls.MenuControl;

[MenuDefinition]
public class SetCurrentFolderExample : EditorExtension
{
    private IRuntimeEditor m_editor;

    protected override void OnInit()
    {
        base.OnInit();

        m_editor = IOC.Resolve<IRuntimeEditor>();
        m_editor.LoadProject += OnLoadProject;
    }

    protected override void OnCleanup()
    {
        base.OnCleanup();
        m_editor.LoadProject -= OnLoadProject;
    }

    private async void OnLoadProject(object sender, System.EventArgs e)
    {
        using var b = m_editor.SetBusy();

        var path = $"{m_editor.GetRootFolderPath()}/New Folder";

        if (!m_editor.Exists(path))
        {
            await m_editor.CreateFolderAsync(path);
        }

        m_editor.CurrentFolderID = m_editor.GetAssetID(path);
    }
}
Runtime Scene
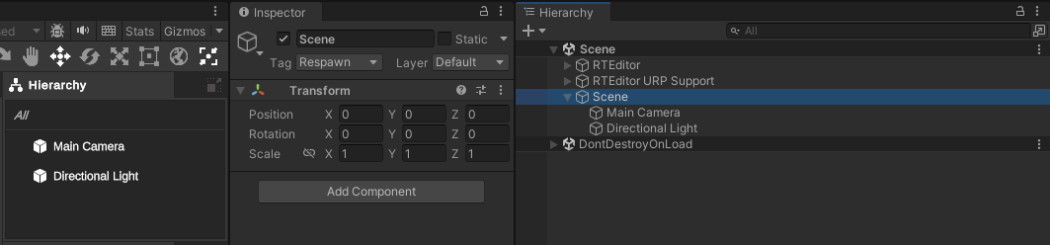
In the current version, the runtime editor requires that all runtime scene objects must be added to the Scene game object (the hierarchy root), which has the "Respawn" tag.
This ensures that the objects are visible in the hierarchy and can be saved as part of the scene.
The exact value of the tag is specified by the ExposeToEditor.HierarchyRootTag field:
public class ExposeToEditor : MonoBehaviour
{
    public static string HierarchyRootTag = "Respawn";
}
To add a game object to the runtime editor scene programmatically, use the AddGameObjectToScene method:
var editor = IOC.Resolve<IRuntimeEditor>();

// Create a game object
var capsule = GameObject.CreatePrimitive(PrimitiveType.Capsule);

// Add the game object to the scene
editor.AddGameObjectToScene(capsule);
Create New, Save, Load scene
Here is an example of how to create, save, and open a scene in the Runtime Editor
using Battlehub.RTCommon;
using Battlehub.RTEditor.Models;
using Battlehub.UIControls.MenuControl;
using UnityEngine;

namespace Battlehub.RTEditor.Examples.Scene31
{
    [MenuDefinition]
    public class SceneExampleMenu : EditorExtension
    {
        private IRuntimeEditor m_editor;
        private IWindowManager m_wm;

        protected override void OnInit()
        {
            base.OnInit();

            m_editor = IOC.Resolve<IRuntimeEditor>();
            m_editor.InitializeNewScene += OnInitializeNewScene;
            m_editor.BeforeSaveCurrentScene += OnBeforeSaveCurrentScene;
            m_editor.SaveCurrentScene += OnSaveCurrentScene;
            m_editor.BeforeOpenScene += OnBeforeOpenScene;
            m_editor.OpenScene += OnOpenScene;
            m_wm = IOC.Resolve<IWindowManager>();
        }

        protected override void OnCleanup()
        {
            base.OnCleanup();

            m_editor.InitializeNewScene -= OnInitializeNewScene;
            m_editor.BeforeSaveCurrentScene -= OnBeforeSaveCurrentScene;
            m_editor.SaveCurrentScene -= OnSaveCurrentScene;
            m_editor.BeforeOpenScene -= OnBeforeOpenScene;
            m_editor.OpenScene -= OnOpenScene;
            m_editor = null;
            m_wm = null;
        }


        [MenuCommand("Example/New Scene")]
        public async void InitializeNewScene()
        {
            using var b = m_editor.SetBusy();

            if (m_editor.CanInitializeNewScene)
            {
                await m_editor.InitializeNewSceneAsync();
            }
            else
            {
                m_wm.MessageBox("Error", "Can't initialize new scene");
            }
        }

        private void OnInitializeNewScene(object sender, System.EventArgs e)
        {
            Debug.Log($"On Create New Scene {m_editor.CurrentScene.name} (ID: {m_editor.CurrentSceneID})");
        }

        private string GetScenePath(PromptDialogArgs args)
        {
            string currentFolderPath = m_editor.GetCurrentFolderPath();
            string sceneExt = m_editor.GetSceneExt();
            string scenePath = $"{currentFolderPath}/{args.Text}{sceneExt}";
            return scenePath;
        }

        [MenuCommand("Example/Save Scene")]
        public void SaveCurrentScene()
        {
            m_wm.Prompt("Enter Scene Name", "My Scene", async (sender, args) =>
            {
                using var b = m_editor.SetBusy();

                if (m_editor.CanSaveScene)
                {
                    string scenePath = GetScenePath(args);

                    await m_editor.SaveCurrentSceneAsync(scenePath);
                }
                else
                {
                    m_wm.MessageBox("Error", "Can't save current scene");
                }
            });
        }

        private void OnBeforeSaveCurrentScene(object sender, BeforeSaveSceneEventArgs e)
        {
            Debug.Log($"On Before Save Current Scene");
        }

        private void OnSaveCurrentScene(object sender, SaveSceneEventArgs e)
        {
            Debug.Log($"On Save Current Scene: {e.Scene.name} (ID: {e.SceneID} Path: {e.ScenePath})");
        }

        [MenuCommand("Example/Open Scene")]
        public void OpenScene()
        {
            m_wm.Prompt("Enter Scene Name", "My Scene", async (sender, args) =>
            {
                using var b = m_editor.SetBusy();

                string scenePath = GetScenePath(args);

                if (m_editor.Exists(scenePath))
                {
                    await m_editor.OpenSceneAsync(scenePath);
                }
                else
                {
                    m_wm.MessageBox("Error", $"Scene {scenePath} does not exist");
                }
            });
        }

        private void OnBeforeOpenScene(object sender, AssetEventArgs e)
        {
            Debug.Log($"On Before Open Scene (ID: {e.AssetID})");
        }

        private void OnOpenScene(object sender, AssetEventArgs e)
        {
            Debug.Log($"On Open Scene (ID: {e.AssetID})");
        }
    }
}
Create, Save, Load, Delete Assets and Folders
This is example on how to create, save, load, delete assets and folders
using Battlehub.RTCommon;
using Battlehub.RTEditor.Models;
using Battlehub.UIControls.MenuControl;
using System.Linq;
using UnityEngine;

namespace Battlehub.RTEditor.Examples.Scene32
{

    [MenuDefinition]
    public class FolderAndAssetExampleMenu : EditorExtension
    {
        private IRuntimeEditor m_editor;
        private IWindowManager m_wm;

        protected override void OnInit()
        {
            m_editor = IOC.Resolve<IRuntimeEditor>();
            m_editor.CreateFolder += OnCreateFolder;
            m_editor.CreateAsset += OnCreateAsset;
            m_editor.SaveAsset += OnSaveAsset;
            m_editor.DeleteAssets += OnDeleteAssets;
            m_wm = IOC.Resolve<IWindowManager>();
        }

        protected override void OnCleanup()
        {
            m_editor.CreateFolder -= OnCreateFolder;
            m_editor.CreateAsset -= OnCreateAsset;
            m_editor.SaveAsset -= OnSaveAsset;
            m_editor.DeleteAssets -= OnDeleteAssets;
            m_editor = null;
            m_wm = null;
        }

        private string GetPath(string name, string ext = null)
        {
            string currentFolderPath = m_editor.GetCurrentFolderPath();
            return $"{currentFolderPath}/{name}{ext}";
        }

        [MenuCommand("Example/Create Folder")]
        public void CreateFolder()
        {
            m_wm.Prompt("Enter Folder Name", "My Folder", async (sender, args) =>
            {
                string path = GetPath(args.Text);

                if (!m_editor.Exists(path))
                {
                    using var b = m_editor.SetBusy();

                    await m_editor.CreateFolderAsync(path);
                }
            });
        }

        [MenuCommand("Example/Delete Folder")]
        public void DeleteFolder()
        {
            m_wm.Prompt("Enter Folder Name", "My Folder", async (sender, args) =>
            {
                string path = GetPath(args.Text);

                if (m_editor.Exists(path))
                {
                    using var b = m_editor.SetBusy();

                    await m_editor.DeleteAssetAsync(path);
                }
                else
                {
                    m_wm.MessageBox("Error",
                        $"A folder named '{args.Text}' is not in the current folder");
                }
            });
        }

        [MenuCommand("Example/Delete Current Folder", validate: true)]
        public bool CanDeleteCurrentFolder()
        {
            return m_editor.CurrentFolderID != m_editor.RootFolderID;
        }

        [MenuCommand("Example/Delete Current Folder")]
        public async void DeleteCurrentFolder()
        {
            using var b = m_editor.SetBusy();

            var currentFolderID = m_editor.CurrentFolderID;
            await m_editor.DeleteAssetAsync(currentFolderID);
        }

        [MenuCommand("Example/Create Prefab", validate: true)]
        public bool CanCreatePrefab()
        {
            var go = m_editor.Selection.activeGameObject;
            return m_editor.CanCreatePrefab(go);
        }

        [MenuCommand("Example/Create Prefab")]
        public async void CreatePrefab()
        {
            using var b = m_editor.SetBusy();

            var go = m_editor.Selection.activeGameObject;
            await m_editor.CreateAssetAsync(go);
        }

        [MenuCommand("Example/Create Material")]
        public async void CreateMaterial()
        {
            var material = Instantiate(RenderPipelineInfo.DefaultMaterial);
            material.name = "Material";
            material.Color(Color.green);
            material.MainTexture(Resources.Load<Texture2D>("Duck"));

            using var b = m_editor.SetBusy();
            await m_editor.CreateAssetAsync(material);
        }


        [MenuCommand("Example/Update Material", validate: true)]
        public bool CanUpdateMaterial()
        {
            return m_editor.Selection.activeObject is Material;
        }

        [MenuCommand("Example/Update Material")]
        public async void UpdateMaterial()
        {
            Material material = (Material)m_editor.Selection.activeObject;
            material.Color(Random.ColorHSV());

            ID assetID = m_editor.GetAssetID(material);
            if (assetID != ID.Empty)
            {
                using var b = m_editor.SetBusy();
                await m_editor.SaveAssetAsync(assetID);
            }
        }

        [MenuCommand("Example/Delete Selected", validate: true)]
        public bool CanDeleteSelected()
        {
            return m_editor.SelectedAssets.Length > 0 &&
                !m_editor.SelectedAssets.Contains(m_editor.RootFolderID);
        }

        [MenuCommand("Example/Delete Selected")]
        public async void DeleteSelected()
        {
            using var b = m_editor.SetBusy();
            var selection = m_editor.SelectedAssets;
            await m_editor.DeleteAssetsAsync(selection);
        }

        private void OnCreateFolder(object sender, CreateFolderEventArgs e)
        {
            Debug.Log(
                $"On Create Folder (ID: {e.AssetID} Path: {m_editor.GetPath(e.AssetID)})");
        }

        private void OnCreateAsset(object sender, CreateAssetEventArgs e)
        {
            Debug.Log(
                $"On Create Asset (ID: {e.AssetID} Path: {m_editor.GetPath(e.AssetID)})");
        }

        private void OnSaveAsset(object sender, SaveAssetEventArgs e)
        {
            Debug.Log(
                $"On Save Asset (ID: {e.AssetID} Path: {m_editor.GetPath(e.AssetID)})");
        }

        private void OnDeleteAssets(object sender, DeleteAssetsEventArgs e)
        {
            for (int i = 0; i < e.AssetID.Count; ++i)
            {
                ID assetID = e.AssetID[i];
                Debug.Log(
                    $"On Delete Asset (ID: {assetID}, Children: {e.ChildrenID[i].Count})");
            }
        }
    }
}
Instantiate asset
This is an example of creating and instantiating an asset.
using Battlehub.RTCommon;
using Battlehub.RTEditor;
using Battlehub.UIControls.MenuControl;
using System.Linq;
using UnityEngine;

[MenuDefinition]
public class InstantiateAssetExample : MonoBehaviour
{
    [MenuCommand("Example/Create Asset")]
    public async void Create()
    {
        var editor = IOC.Resolve<IRuntimeEditor>();

        // Create game object
        var capsule = GameObject.CreatePrimitive(PrimitiveType.Capsule);
        editor.AddGameObjectToScene(capsule, select:false);

        // Expose to editor
        capsule.AddComponent<ExposeToEditor>();

        // Get .prefab extension
        var ext = editor.GetExt(capsule);

        // Get unique asset path
        var path = editor.GetUniquePath($"Capsule{ext}");

        // Create asset
        await editor.CreateAssetAsync(capsule, path);

        // Select create asset
        editor.SelectedAssets = new[] { editor.GetAssetID(path) };
    }

    [MenuCommand("Example/Instantiate Asset", validate:true)]
    public bool CanInstanate()
    {
        var editor = IOC.Resolve<IRuntimeEditor>();
        return editor.SelectedAssets.Any(asset => editor.CanInstantiateAsset(asset));
    }


    [MenuCommand("Example/Instantiate Asset")]
    public  async void Instanate()
    {
        var editor = IOC.Resolve<IRuntimeEditor>();
        using var b = editor.SetBusy();

        // Instantiate selected assets
        var result = await editor.InstantiateAssetsAsync(editor.SelectedAssets);

        // Select instances
        editor.Selection.objects = result.Instances;
    }
}
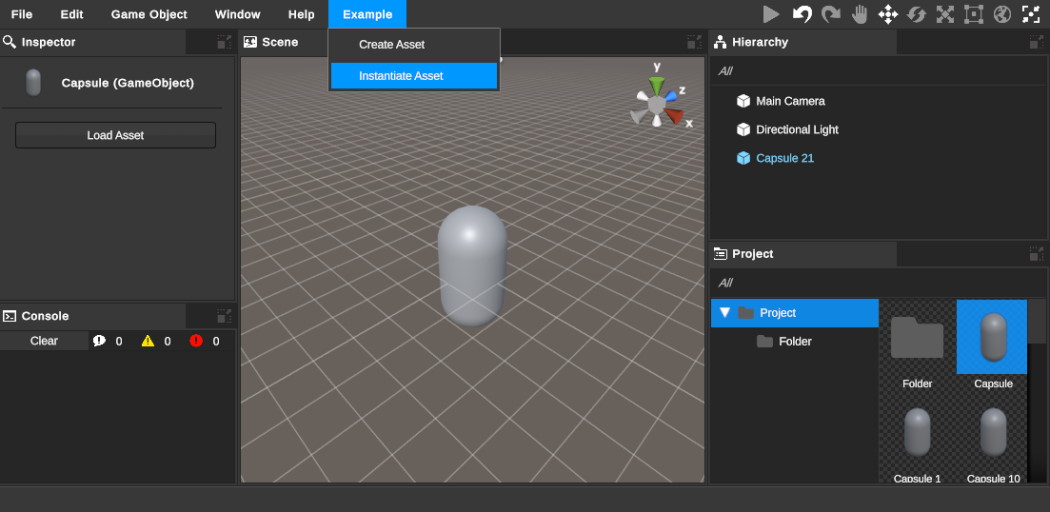
Duplicate Asset
You can duplicate any asset or folder you select in the project view.
using Battlehub.RTCommon;
using Battlehub.RTEditor;
using Battlehub.RTEditor.Models;
using Battlehub.UIControls.MenuControl;
using UnityEngine;

[MenuDefinition]
public class DuplicateAssetExample : MonoBehaviour
{
    [MenuCommand("Example/Duplicate Asset", validate:true)]
    public bool CanDuplicate()
    {
        var editor = IOC.Resolve<IRuntimeEditor>();
        return editor.SelectedAssets.Length > 0 &&
            editor.CanDuplicateAsset(editor.SelectedAssets[0]);
    }


    [MenuCommand("Example/Duplicate Asset")]
    public async void Dupicate()
    {
        var editor = IOC.Resolve<IRuntimeEditor>();

        var assetID = editor.SelectedAssets[0];
        string path = editor.GetPath(assetID);
        string targetPath = editor.GetUniquePath(path);

        using var b = editor.SetBusy();
        await editor.DuplicateAssetAsync(assetID, targetPath);
    }
}
Move Asset
This example shows how to move an asset. You can rename assets using the same approach.
using Battlehub.RTCommon;
using Battlehub.RTEditor;
using Battlehub.RTEditor.Models;
using Battlehub.UIControls.MenuControl;
using UnityEngine;

[MenuDefinition]
public class MoveAssetExample : MonoBehaviour
{
    [MenuCommand("Example/Move Asset", validate: true)]
    public bool CanMoveAsset()
    {
        var editor = IOC.Resolve<IRuntimeEditor>();
        return editor.SelectedAssets.Length > 0;
    }


    [MenuCommand("Example/Move Asset")]
    public async void MoveAsset()
    {
        var editor = IOC.Resolve<IRuntimeEditor>();

        var assetID = editor.SelectedAssets[0];
        string path = editor.GetPath(assetID);
        string targetPath = editor.GetUniquePath(path);

        using var b = editor.SetBusy();
        await editor.MoveAssetAsync(editor.SelectedAssets[0], targetPath);
    }
}
Import Export Assets
Install the SharpZipLib package. In Package Manager, click on "+ Add package by name" and enter "com.unity.sharp-zip-lib"
     private async Task ExportAssetsAsync(string path)
     {
         if (File.Exists(path))
         {
             File.Delete(path);
         }

         using (var fs = File.OpenWrite(path))
         {
             var editor = IOC.Resolve<IRuntimeEditor>();

             using var b = editor.SetBusy();
             await editor.ExportAssetsAsync(editor.SelectedAssets, fs, includeDependencies:true);
         }
     }


     private async Task ImportAssetsAsync(string path)
     {
         using (var fs = File.OpenRead(path))
         {
             var editor = IOC.Resolve<IRuntimeEditor>();

             using var b = editor.SetBusy();
             await editor.ImportAssetsAsync(fs);
         }
     }
Note
For complete example, see Scene33 - Export And Import Asset in the Example Scenes section.
External Asset Loaders
External asset loaders are used to load external assets imported into a project.
An external asset is an asset loaded into the project using a specific loader, such as the Addressable Loader, a loader that loads assets from the Resources folder, a GLB loader, or any other third-party loader.
External assets are read-only and contain only identifiers for parts within the data file. If you need to make edits to an external asset, you can create an asset variant of it.
There are four built-in external asset loaders:
Resources Loader
Located atAssets\Battlehub\RTEditor\Runtime\RTEditor\Models\AssetDatabaseImportSources\ResourcesLoaderModel.csAddressables Loader
Located atAssets\Battlehub\RTEditor\Runtime\RTEditor\Models\AssetDatabaseImportSources\AddressablesLoaderModel.cs
Important: You must install com.unity.addressables to use this loader. For more information, refer to the Unity Addressables documentation.
- GLTFast Loader
Located atAssets\Battlehub\RTImporter\Runtime\Importers\GltfImporter.cs
Important: You must install com.unity.cloud.gltfast to use this loader. For more information, refer to the GLTFast documentation.
- DemoGameAssets Loader
Located atAssets\Battlehub\RTEditorDemo\Examples\RTEditor DemoGame\DemoGameAssetsLoader.cs
To create your own loader, implement the IExternalAssetLoaderModel interface:
using Battlehub.RTEditor.Models;
using System;
using System.Collections.Generic;
using System.Threading.Tasks;
using UnityEngine;

using UnityObject = UnityEngine.Object;
public class MyLoader : IExternalAssetLoaderModel
{
    public string LoaderID => nameof(MyLoader);

    public Task<object> LoadAsync(string key, object root, IProgress<float> progress = null)
    {
        var parent = root as Transform;

        GameObject asset;
        switch(key)
        {
            case "Cube":
                asset = GameObject.CreatePrimitive(PrimitiveType.Cube);
                break;
            case "Capsule":
                asset = GameObject.CreatePrimitive(PrimitiveType.Capsule);
                break;
            default:
                throw new KeyNotFoundException(key);
        }

        asset.transform.SetParent(parent, false);

        return Task.FromResult<object>(asset);
    }

    public void Release(object obj)
    {
        var asset = obj as UnityObject;
        if (asset != null)
        {
            UnityObject.Destroy(asset);
        }
    }
}
To register your custom loader, use the AddExternalAssetLoader method:
using Battlehub.RTCommon;
using Battlehub.RTEditor;
using Battlehub.RTEditor.Models;

public class RegisterMyLoader : EditorExtension
{
    private IRuntimeEditor m_editor;
    private IExternalAssetLoaderModel m_loader;

    protected override void OnInit()
    {
        m_editor = IOC.Resolve<IRuntimeEditor>();

        m_loader = new MyLoader();

        m_editor.AddExternalAssetLoader(m_loader);
    }

    protected override void OnCleanup()
    {
        m_editor.RemoveExternalAssetLoader(m_loader);
        m_editor = null;
    }
}
After registering the custom loader, you can use the ImportExternalAssetAsync method to import an external asset by providing the loader ID and key to the method:
using var b = m_editor.SetBusy();
await m_editor.ImportExternalAssetAsync(m_editor.RootFolderID, key: "Cube", loaderID: nameof(MyLoader), desiredName: "My External Asset");
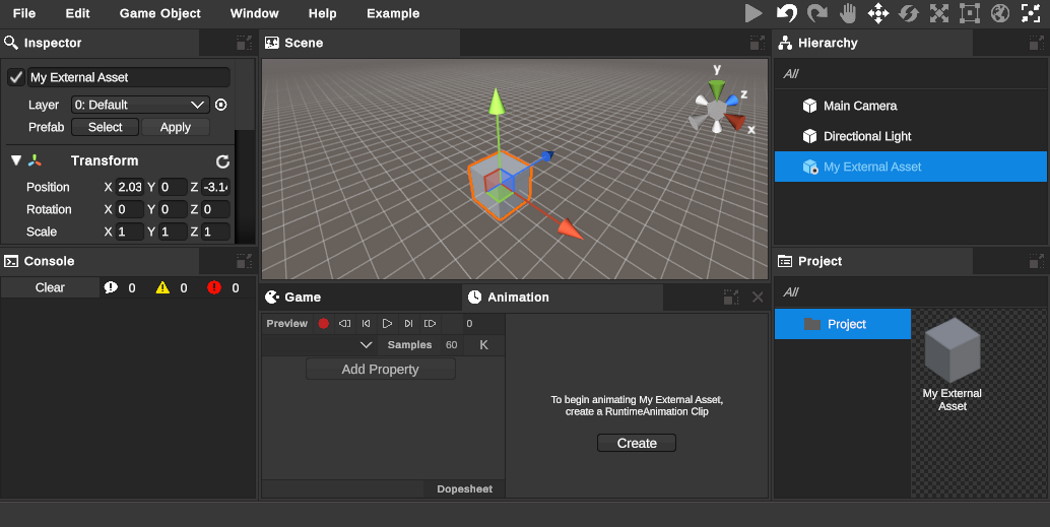
Note
For the Resources Loader, you should use the relative path in the Resources folder as the key (this is the same as the path parameter in the Resources.Load method).
For the Addressables Loader, the key will be used as a parameter for the Addressables.LoadAsset method.
For the GLTFastLoader Loader, the key can be an absolute URI, an absolute path, or a path relative to the .Library folder inside the runtime project folder.
Here is the refined documentation with improved grammar and clarity:
TriLibLoader Example
The Runtime Editor is only able to load .glb and .gltf models. For .fbx and other formats, you need to use an asset such as TriLib. Here is an example of how to create an external asset loader using the TriLib library and integrate it with the Runtime Editor. The procedure is almost the same as for any other loader.
Implement IExternalAssetLoaderModel
using Battlehub.RTCommon;
using Battlehub.RTEditor.Models;
using System;
using System.IO;
using System.Threading.Tasks;
using TriLibCore;
using UnityEngine;

public class TriLibLoaderModel : IExternalAssetLoaderModel
{
    public string LoaderID => nameof(TriLibLoaderModel);

    public string LibraryFolder { get; set; }

    private Task<GameObject> LoadUsingTriLibAsync(string filePath, Transform root)
    {
        TaskCompletionSource<GameObject> tcs = new TaskCompletionSource<GameObject>();
        GameObject go = null;
        var options = AssetLoader.CreateDefaultLoaderOptions();
        options.AddAssetUnloader = false;

        AssetLoader.LoadModelFromFile(filePath, ctx =>
        {
            go = ctx.RootGameObject;
            go.transform.SetParent(root);
        },
        ctx =>
        {
            tcs.SetResult(go);
        },
        (ctx, progress) => { },
        err =>
        {
            tcs.SetException(err.GetInnerException());
        },
        null, options);

        return tcs.Task;
    }

    public async Task<object> LoadAsync(string key, object root, IProgress<float> progress = null)
    {
        string path;
        if (Uri.TryCreate(key, UriKind.Absolute, out _) || Path.IsPathRooted(key))
        {
            path = key;
        }
        else
        {
            path = !string.IsNullOrEmpty(LibraryFolder) ? $"{LibraryFolder}/{key}" : key;
        }

        var go = await LoadUsingTriLibAsync(path, root as Transform);
        var parts = go.GetComponentsInChildren<Transform>(true);
        foreach (var part in parts)
        {
            part.gameObject.AddComponent<ExposeToEditor>();
        }

        return go;
    }

    public void Release(object obj)
    {
        GameObject go = obj as GameObject;
        if (go != null)
        {
            UnityEngine.Object.Destroy(go);
        }
    }
}
Register TriLibLoader
using Battlehub.RTCommon;
using Battlehub.RTEditor;
using Battlehub.RTEditor.Models;

public class RegisterTriLibLoader : EditorExtension
{
    private IRuntimeEditor m_editor;
    private IExternalAssetLoaderModel m_loader;

    protected override void OnInit()
    {
        m_editor = IOC.Resolve<IRuntimeEditor>();
        m_loader = new TriLibLoaderModel();
        m_editor.AddExternalAssetLoader(m_loader);
    }

    protected override void OnCleanup()
    {
        m_editor.RemoveExternalAssetLoader(m_loader);
        m_editor = null;
    }
}
Import FBX as External Asset
using var b = m_editor.SetBusy();

string key = "F:/ModelsCollection/ikea desk.fbx";
string loaderID = nameof(TriLibLoaderModel);
string name = "My Model";

await m_editor.ImportExternalAssetAsync(m_editor.RootFolderID, key, loaderID, name);
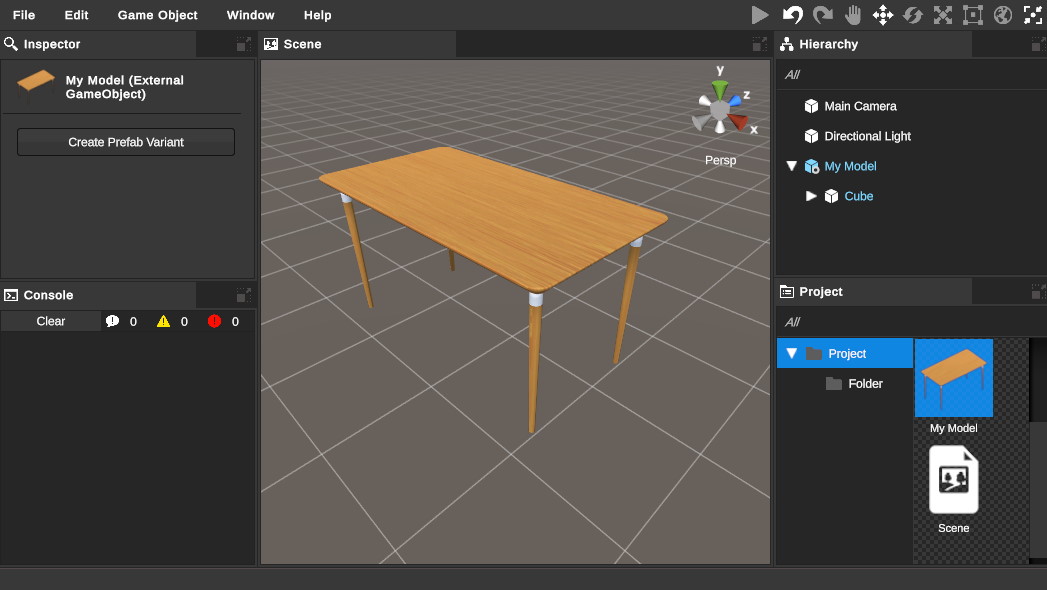
Import Sources
If you want to allow the user to select which assets to import and import them themselves, you should create import sources.
There are three built-in import sources:
- Addressables Import Source: To use Addressables Import Source, you should install the com.unity.addressables package.
- Resources Import Source
- DemoGame Import Source
In the Runtime Editor, if you click File > Import Assets, the asset database import source window will open, and you will see a dropdown with all available import sources.
- Select an import source from the dropdown.
- The list of asset groups will be loaded (by default, there is only one Default group in all built-in sources).
- Select a group and click OK.
- You will be navigated to the asset database import view.
- Select assets and click Import.
The IRuntimeEditor.ImportExternalAssetAsync method will be called for each of the selected assets with the corresponding key and loader ID.

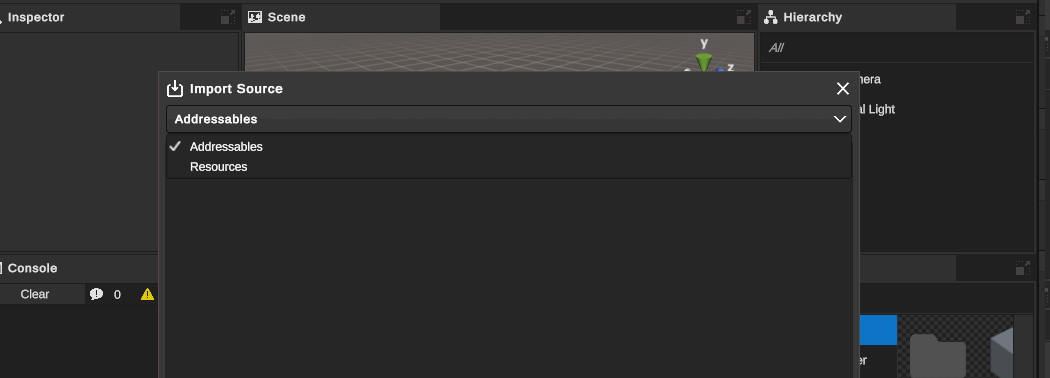
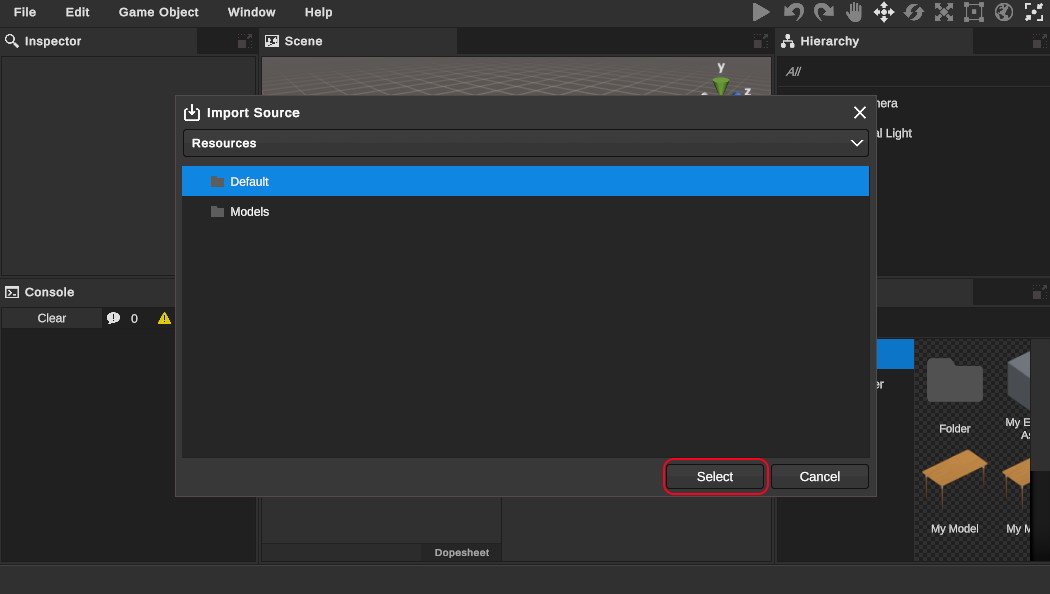

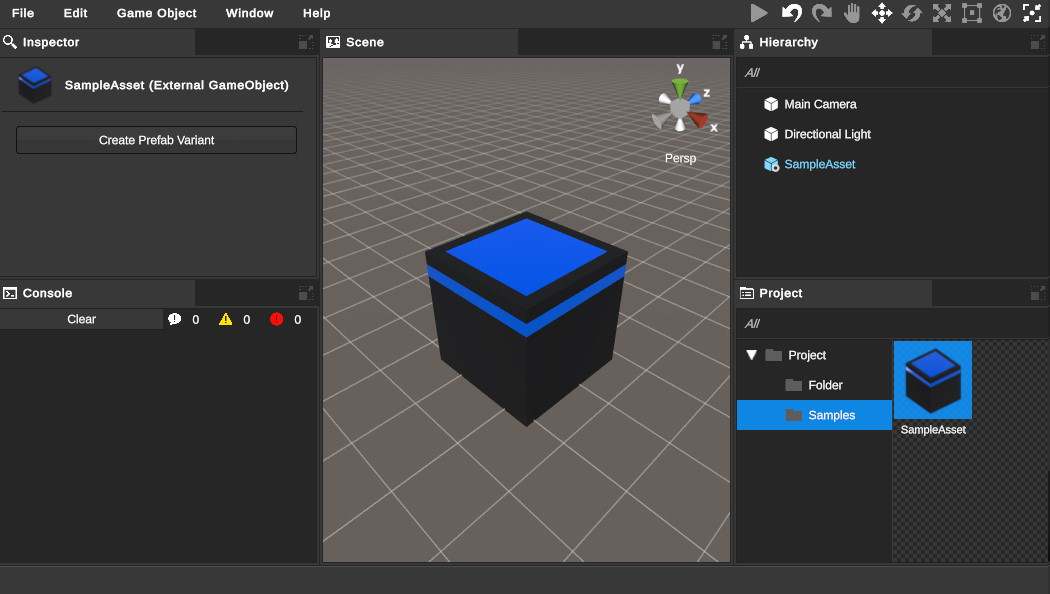
Resources Import Source
To access built-in import sources and modify groups and assets, follow these steps:
- Create Asset Database
- Click
Tools->Runtime Editor->Create Asset Database
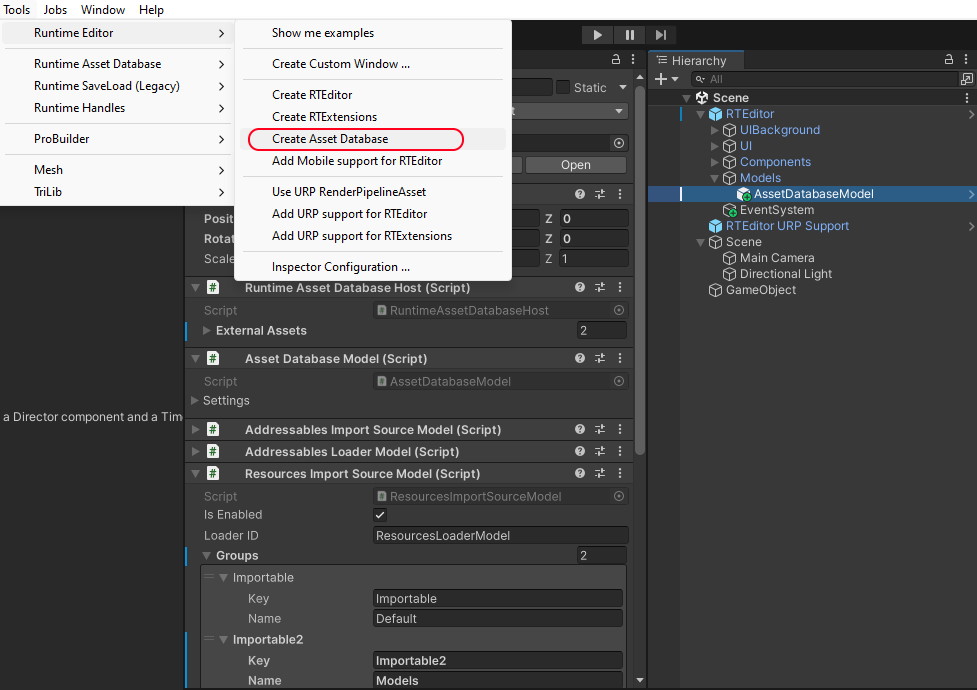
- Collect Scene Assets (Optional)
- If you want assets referenced from the scene to be collected into the SceneAssetsList and registered as external assets, click Save. Otherwise, click Cancel.
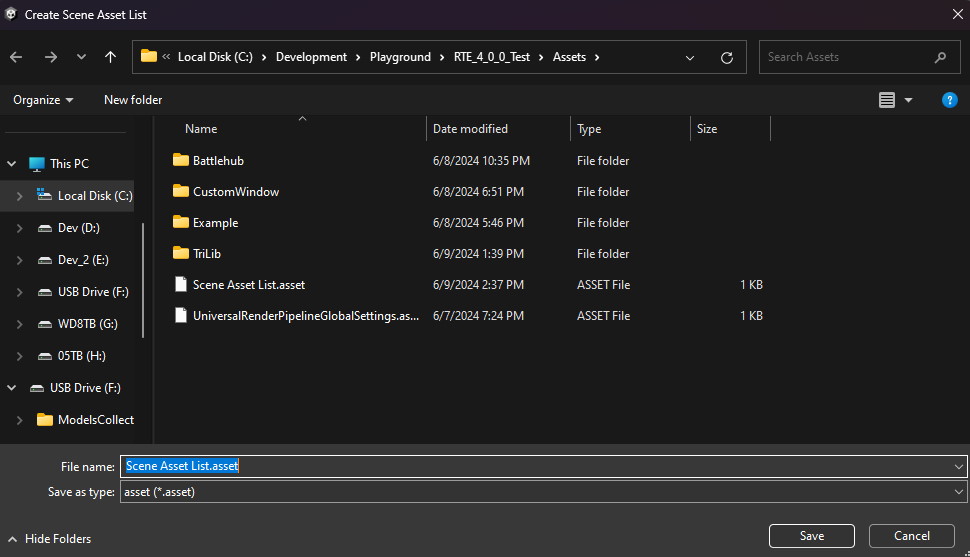
- Add Assets or Groups
- Add more assets or groups. The Group key in the groups list must match the Group key in the assets list. The Asset Key must be equal to the path relative to the Resources folder.
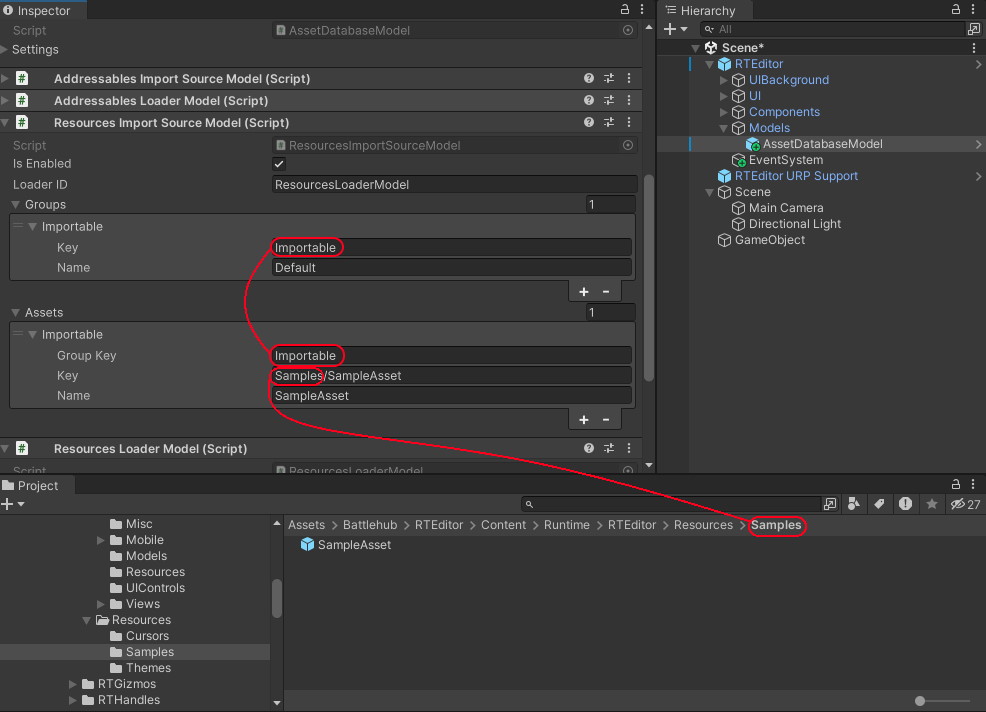
Note
It is possible to do the same programmatically. The
ResourcesImportSourceModelhas two public methods:void ResourcesImportSourceModel.SetGroups(ImportGroup[] groups) void ResourcesImportSourceModel.SetAssets(ImportAsset[] assets)The
ImportGroupandImportAssetclasses are used to define the groups and assets to be imported.
Addressables Import Source
- Install the Addressables Package
- Install the com.unity.addressables package.
- Create Addressables Settings
- Navigate to
Window>Asset Management>Addressables>Groups(clickCreate Addressables Settingsif needed).
- Make Prefabs Addressable
- Make some prefabs addressable by selecting Addressable checkbox. Assign the "default" label.
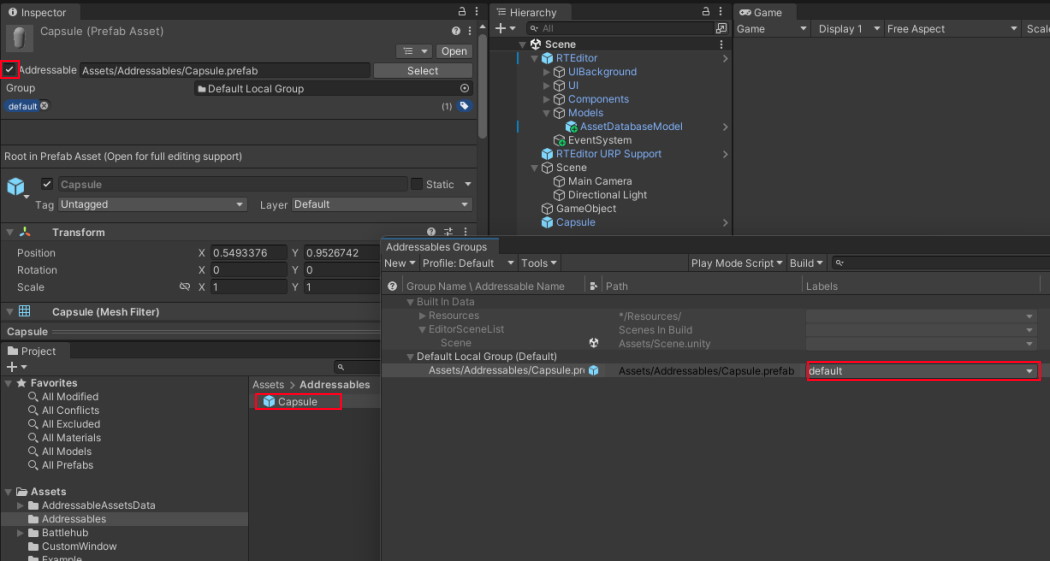
- Create a New Build (Optional)
- Optionally, switch the PlayMode script to "Use Existing Build" and create a new build.
- Configure AssetDatabaseModel
- Select the
AssetDatabaseModelgame object (If you don't have it in the scene, add it as described here). - Ensure the group key matches the label of the addressables you want to show in that group during import.
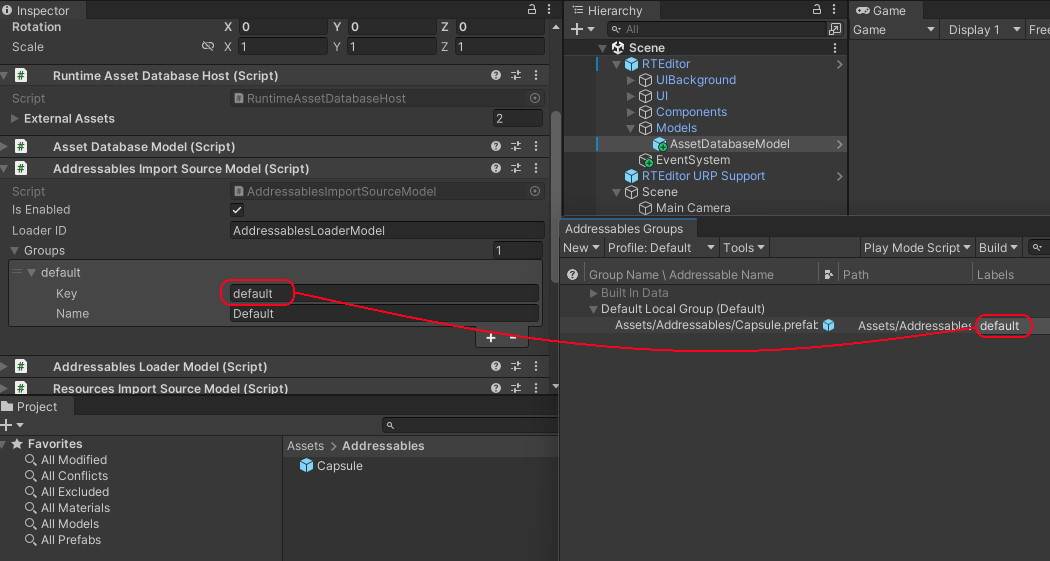
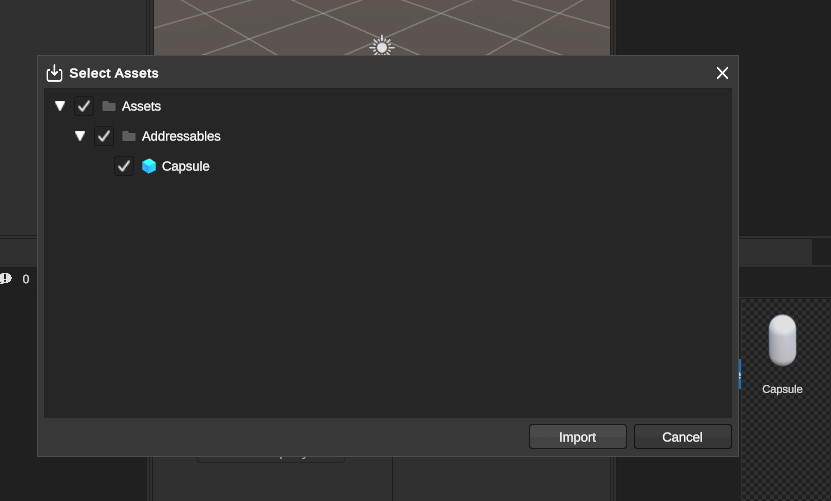
Custom Import Source
To create your own import source, follow these steps:
Implement the
IImportSourceModelInterfaceusing Battlehub.RTEditor.Models; using System.Threading.Tasks; public class MyImportSource : IImportSourceModel { public bool IsEnabled => true;<pre><code>public int SortIndex => 0; public string DisplayName => "My Import Source"; public string LoaderID => nameof(MyLoader); public Task<IImportGroup[]> GetGroupsAsync() { IImportGroup[] groups = new[] { new ImportGroup( key: "DefaultGroupKey", name: "My Group") }; return Task.FromResult(groups); } public Task<IImportAsset[]> GetAssetsAsync(string groupKey) { var assets = new[] { new ImportAsset("DefaultGroupKey", "Cube", "My Cube"), new ImportAsset("DefaultGroupKey", "Capsule", "My Capsule"), }; return Task.FromResult<IImportAsset[]>(assets); } </code></pre>}Register the Custom Import Source
using Battlehub.RTCommon;
using Battlehub.RTEditor;

public class RegisterMyImportSource : EditorExtension
{
    private IRuntimeEditor m_editor;
    private MyImportSource m_importSource;<pre><code>protected override void OnInit()
{
    m_importSource = new MyImportSource();
    m_editor = IOC.Resolve<IRuntimeEditor>();
    m_editor.AddImportSource(m_importSource);
}

protected override void OnCleanup()
{
    m_editor.RemoveImportSource(m_importSource);
    m_importSource = null;
    m_editor = null;
}
</code></pre>}
Use the Custom Import Source
Once registered, your custom import source will be available in the Runtime Editor's asset import dropdown. Users can select it and import assets as configured.
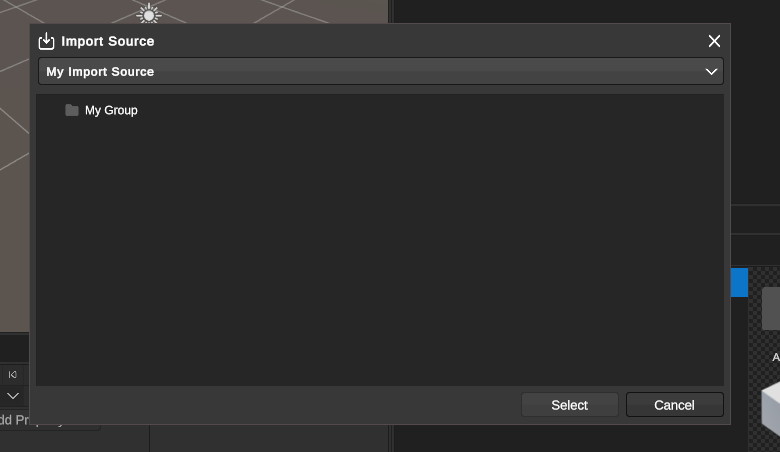
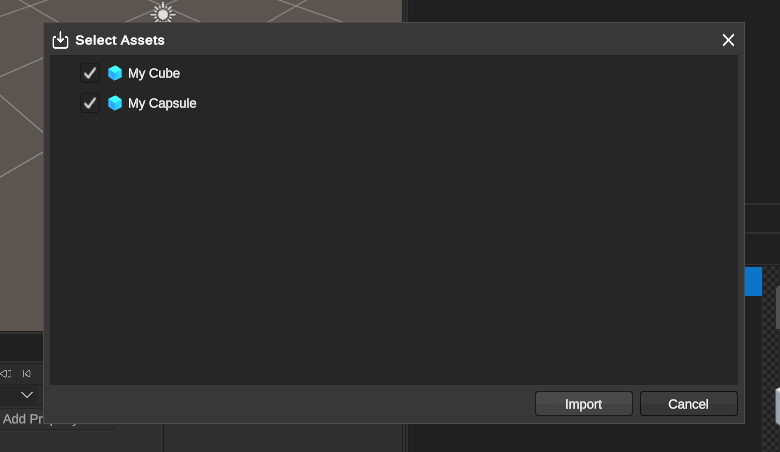
Note
In this example,
MyLoaderfrom External Asset Loaders is being used. Ensure you have implemented and registeredMyLoaderas described in the previous sections.
File Importers
File importers come into play when you open the file picker using File -> Import From File in the Runtime Editor menu.
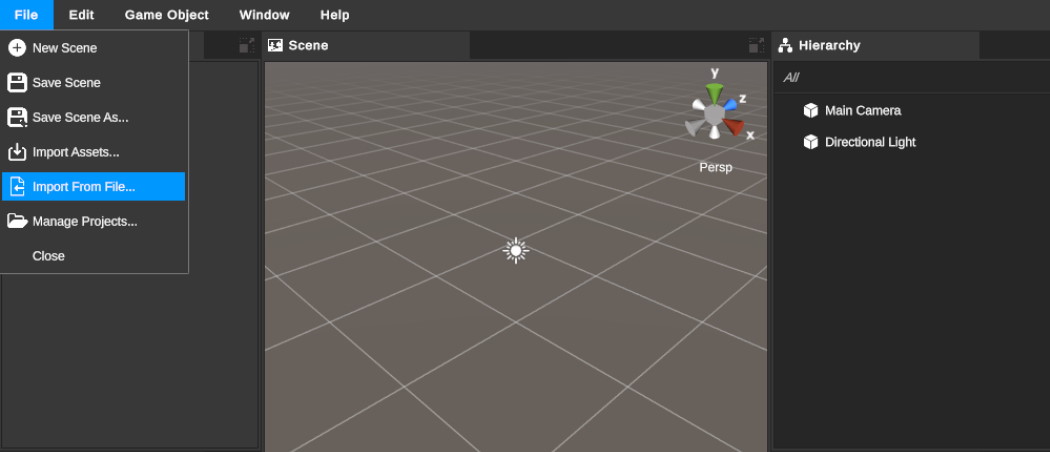

The file picker determines which types of files to show by inspecting the supported extensions of available file importers.
There are four built-in file importers:
- GlbImporter
- GltfImporter
- PngImporter
- JpgImporter
Note
To enableGlbImporterandGltfImporter, you should install com.unity.cloud.gltfast. For more information, refer to the GLTFast documentation.
Custom File Importer
To create a custom file importer, you need to create a class derived from AssetDatabaseFileImporter.
Override the FileExt field to return the supported file extension and implement the ImportAsync method.
In the example below, the TriLibLoader from the TriLib Loader Example is used to load an external asset.
Imported models are cached in the .Library folder.
Note
You don't have to use loaders in the import method; you can simply use the IRuntimeEditor.CreateAsset method to create a normal asset, not an external one.
using Battlehub.RTEditor;
using Battlehub.RTEditor.Models;
using System;
using System.Threading;
using System.Threading.Tasks;

public class FbxFileImporter : AssetDatabaseFileImporter
{
    public override int Priority
    {
        get { return int.MinValue; }
    }

    public override string FileExt
    {
        get { return ".fbx"; }
    }

    public override string IconPath
    {
        get { return "Importers/Fbx"; }
    }

    public override async Task ImportAsync(string filePath, string targetPath, CancellationToken cancelToken)
    {
        try
        {
            Guid assetID = Guid.NewGuid();
            string externalAssetKey = AddFileToLibrary(filePath, assetID);
            await ImportExternalAsset(targetPath, assetID, externalAssetKey, m_assetLoader);
        }
        catch (Exception e)
        {
            throw new FileImporterException(e.Message, e);
        }
    }

    private IExternalAssetLoaderModel m_assetLoader;
    public override void Load()
    {
        base.Load();

        var triLibLoader = new TriLibLoaderModel
        {
            LibraryFolder = Editor.LibraryRootFolder
        };
        m_assetLoader = triLibLoader;

        Editor.AddExternalAssetLoader(m_assetLoader.LoaderID, m_assetLoader);
    }

    public override void Unload()
    {
        Editor.RemoveExternalAssetLoader(m_assetLoader.LoaderID);
        m_assetLoader = null;

        base.Unload();
    }
}
Web Storage Sample
You can use the runtime asset database in conjunction with an HTTP web server, in WebGL and Standalone builds.
To start the web sample, follow these steps:
- Install the Newtonsoft Json package). In Package Manager, click on "+ Add package by name" and enter "com.unity.nuget.newtonsoft-json"
- Unpack the
Asset/Battlehub/Storage.WebUnity package. - Open the
Asset/Battlehub.Extensions/Storage.Web/SampleSceneUnity scene. - Extract
Asset/Battlehub.Extensions/Storage.Web/SampleHttpServer.zipto a folder (e.g.,C:\SampleHttpWebServer). - Install Node.js from Node.js.
- Open a terminal and navigate to
C:\SampleHttpWebServer. - Run the command
npm install. - Run the command
node app.js. - Enter play mode in Unity.
- The projects will be created in the
Project Root Folder Path(see SampleScene/RuntimeEditor/Runtime Editor (Script)/Extra Settings/Projects Root Folder Path).
Serializer Extensions
Surrogates are intermediary classes used by the Serializer to facilitate the reading and writing of data to Unity objects during serialization. To enable the serialization of a specific class, you must create a surrogate for it. These surrogates can be generated automatically or created from scratch. To generate a Surrogate class, you can use the "Create Surrogates" window.
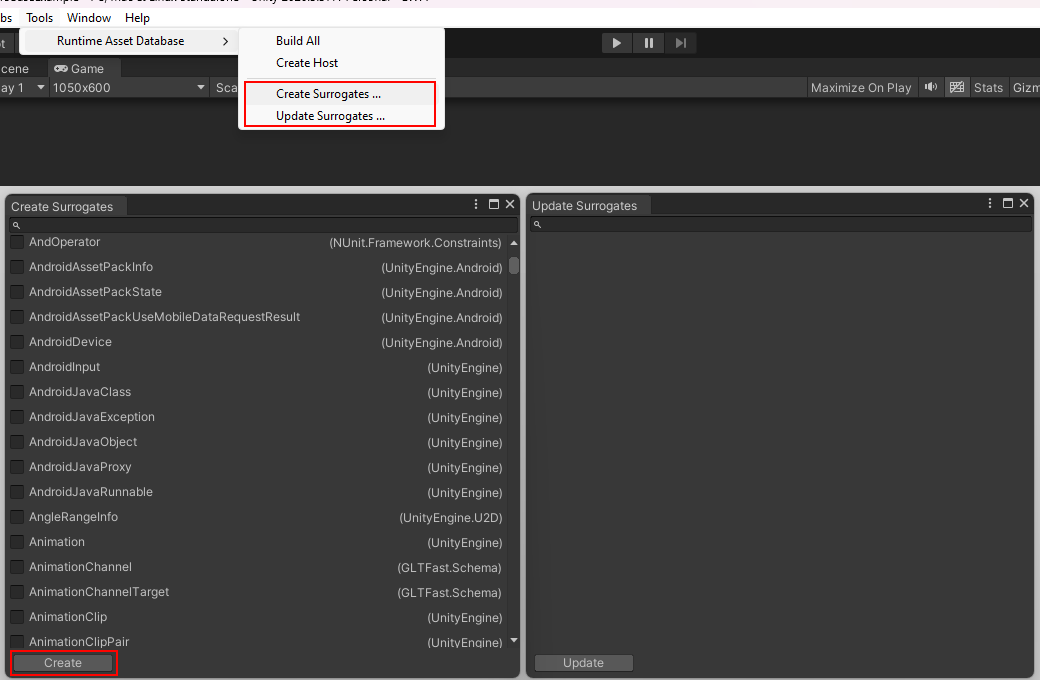
Sample component:
using UnityEngine;

public class MyComponent : MonoBehaviour
{
    public Material Material;

    public GameObject Target;

    public int IntValue;

    public string StringValue;
}
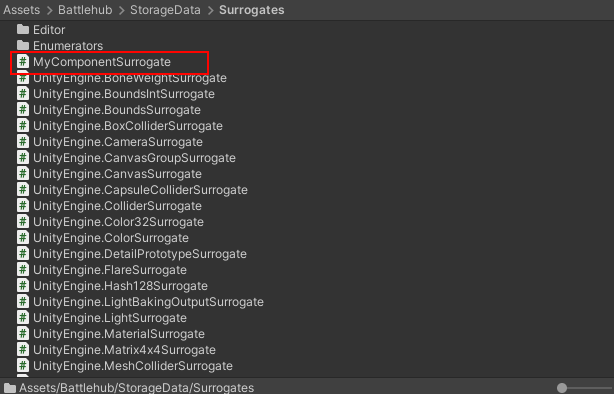
using ProtoBuf;
using System;
using System.Threading.Tasks;

namespace Battlehub.Storage.Surrogates
{
    [ProtoContract]
    [Surrogate(typeof(global::MyComponent), _PROPERTY_INDEX, _TYPE_INDEX)]
    public class MyComponentSurrogate<TID> : ISurrogate<TID> where TID : IEquatable<TID>
    {
        const int _PROPERTY_INDEX = 7;
        const int _TYPE_INDEX = 153;
        //_PLACEHOLDER_FOR_EXTENSIONS_DO_NOT_DELETE_OR_CHANGE_THIS_LINE_PLEASE

        [ProtoMember(2)]
        public TID id { get; set; }

        [ProtoMember(3)]
        public TID gameObjectId { get; set; }

        [ProtoMember(4))]
        public global::System.Boolean enabled { get; set; }

        [ProtoMember(5)]
        public TID Material { get; set; }

        [ProtoMember(6)]
        public TID Target { get; set; }

        [ProtoMember(7))]
        public global::System.Int32 IntValue { get; set; }
        //_PLACEHOLDER_FOR_NEW_PROPERTIES_DO_NOT_DELETE_OR_CHANGE_THIS_LINE_PLEASE

        public ValueTask Serialize(object obj, ISerializationContext<TID> ctx)
        {
            var idmap = ctx.IDMap;

            var o = (global::MyComponent)obj;
            id = idmap.GetOrCreateID(o);
            gameObjectId = idmap.GetOrCreateID(o.gameObject);
            enabled = o.enabled;
            Material = idmap.GetOrCreateID(o.Material);
            Target = idmap.GetOrCreateID(o.Target);
            IntValue = o.IntValue;
            //_PLACEHOLDER_FOR_SERIALIZE_METHOD_BODY_DO_NOT_DELETE_OR_CHANGE_THIS_LINE_PLEASE

            return default;
        }

        public ValueTask<object> Deserialize(ISerializationContext<TID> ctx)
        {
            var idmap = ctx.IDMap;

            var o = idmap.GetComponent<global::MyComponent, TID>(id, gameObjectId);
            o.enabled = enabled;
            o.Material = idmap.GetObject<global::UnityEngine.Material>(Material);
            o.Target = idmap.GetObject<global::UnityEngine.GameObject>(Target);
            o.IntValue = IntValue;
            //_PLACEHOLDER_FOR_DESERIALIZE_METHOD_BODY_DO_NOT_DELETE_OR_CHANGE_THIS_LINE_PLEASE

            return new ValueTask<object>(o);
        }
    }
}
After successfully generating surrogates, you have the flexibility to make various customizations within your surrogate class. You can remove properties that you don't want to be serialized, add new properties, or perform other operations as needed.
To prevent changes you make to surrogates from being tracked and displayed in the "Update Surrogates" window, you can set the enableUpdates attribute to false using the following syntax:
[Surrogate(typeof(global::MyComponent), _PROPERTY_INDEX, _TYPE_INDEX, enableUpdates: false)]
For value types, make sure to set enabled to false like this:
[Surrogate(typeof(global::MyComponent), _PROPERTY_INDEX, _TYPE_INDEX, enabled: false)]
Two constants, int PROPERTYINDEX and int TYPEINDEX, have following purpose:
- int PROPERTYINDEX: This constant assists the surrogate updater in determining the index of the next property to be generated.
- int TYPEINDEX: This constant acts as a unique type index.
Please note that references to other types with surrogates are replaced with their identifier (TID). You can use an "idmap" to generate unique IDs for objects and retrieve objects using their corresponding IDs.
Enumerators
The enumerator is created along with the surrogate. Enumerators are specialized classes used to retrieve Unity object dependencies in a structured manner. These enumerators enable the serialization of an entire object tree, ensuring that dependencies are deserialized before dependent objects during the deserialization process.
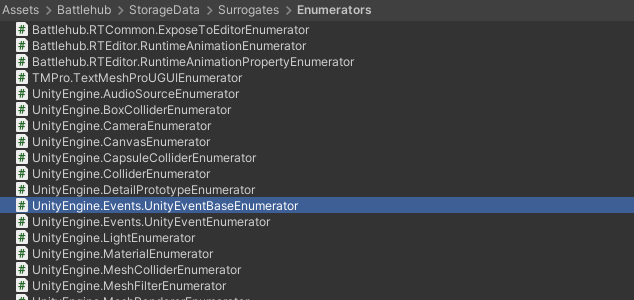
namespace Battlehub.Storage.Enumerators
{
    [ObjectEnumerator(typeof(global::MyComponent))]
    public class MyComponentEnumerator : ObjectEnumerator<global::MyComponent>
    {
        public override bool MoveNext()
        {
            do
            {
                switch (Index)
                {

                    case 0:
                        if (MoveNext(TypedObject.Material, 5))
                            return true;
                        break;
                    case 1:
                        if (MoveNext(TypedObject.Target, 6))
                            return true;
                        break;
                    case 2:
                        if (MoveNext(Object, -1))
                            return true;
                        break;
                    default:
                        return false;
                }
            }
            while (true);
        }
    }
}
Note that the second parameter of the MoveNext method is the property index, which should be equal to the argument of the ProtoMember attribute assigned to that property in the surrogate class.
You can also use the following simplified syntax when editing an enumerator:
namespace Battlehub.Storage.Enumerators
{
    [ObjectEnumerator(typeof(global::MyComponent))]
    public class MyComponentEnumerator : ObjectEnumerator<global::MyComponent>
    {
       protected override IEnumerator<(object Object, int Key)> GetNext()
       {
           yield return (TypedObject.Material, 5);
           yield return (TypedObject.Target, 6);
           yield return (TypedObject, -1);
       }
    }
}
Dynamic Surrogates (Preview)
It is possible to avoid creating surrogates by hand, instead letting the runtime asset database serialize types using reflection at runtime. This process is roughly equivalent to Unity serialization rules. It works with fields and not with properties.
To enable Dynamic Surrogate for a type, use the following code:
var assetDatabase = IOC.Resolve<IAssetDatabaseModel>(;
assetDatabase.AddRuntimeSerializableTypes(typeof(MyMonoBehaviour));
To use field serialization, ensure that the field:
- Is public, or has a
SerializeFieldattribute. - Isn’t static.
- Isn’t const.
- Isn’t readonly.
- Has a field type that can be serialized:
- Primitive data types (int, float, double, bool, string, etc.)
- Enum types (32 bits or smaller)
- Fixed-size buffers
- Unity built-in types, for example, Vector2, Vector3, Rect, Matrix4x4, Color. Some types like AnimationCurve will not be serialized.
- Custom structs with the
Serializableattribute - References to objects that derive from
UnityEngine.Object - Custom classes with the
Serializableattribute (see Serialization of custom classes). - An array of a field type mentioned above.
- A
List<T>of a field type mentioned above.
Serialization of Custom Classes
For Unity to serialize a custom class, ensure the class:
- Has the
Serializableattribute. - Isn’t static.
The [SerializeReference] attribute is not supported.
Custom Serialization
Sometimes you might want to serialize something that the serializer doesn’t support (for example, a C# Dictionary). The best approach is to implement the ISerializationCallbackReceiver interface in your class. This allows you to implement callbacks that are invoked at key points during serialization and deserialization:
- When an object is about to be serialized, Runtime Asset Database invokes the
OnBeforeSerialize()callback. Inside this callback is where you can transform your data into something Runtime Asset Database understands. For example, to serialize a C# Dictionary, copy the data from the Dictionary into an array of keys and an array of values. - After the
OnBeforeSerialize()callback is complete, Runtime Asset Database serializes the arrays. - Later, when the object is deserialized, Runtime Asset Database invokes the
OnAfterDeserialize()callback. Inside this callback is where you can transform the data back into a form that’s convenient for the object in memory. For example, use the key and value arrays to repopulate the C# Dictionary.
Build All
After finishing creating or updating surrogates, make sure to click "Tools" > "Runtime Asset Library" > "Build All" from the main menu. This command will build the type model and serializer.

Support
If you cannot find something in the documentation or have any questions, please feel free to send an email to [email protected] or ask directly in this support group. You can also create an issue here.
Keep up the great work in your development journey! 😊